
Have you ever been sewing a beautiful dress for a special occasion, only to find that the stitches are skipping and ruining your handiwork? You’re not alone. Rachel was recently in this situation; she had spent weeks working on her daughter’s prom dress, when all of a sudden, halfway through, the machine began missing stitches. She was devastated!
Skipping stitches is one of the most common issues with sewing machines and can be caused by many different factors. Knowing what causes skip stitches can help sewers prevent them from occurring again.
This article will explore various reasons why skip stitches occur so that sewers like Rachel don’t have to worry about their projects being ruined due to technical difficulties.
If you’re ready to take control over your sewing projects instead of letting technical glitches get in the way of creating something beautiful, keep reading and discover what could cause those pesky skipped stitches in your next project.
Related Topic: How to Get Broken Needle Out of Sewing Machine: Welcome to the Club!
What is the Cause of Skip Stitches in Sewing Machines: Overview
Skipping stitches can be a major annoyance when it comes to sewing. It’s important to understand why this might happen and how to troubleshoot the problem. Let’s look at some of the main reasons for skipped stitches, starting with bobbin tension.
Bobbin tension is one of the first things that need checking if you have skipping stitches. The correct level of tension will depend on what type of fabric or thread you are using – too much or too little upper tension can cause your machine to skip stitches. Presser foot pressure should also be adjusted accordingly as improper pressure settings can also lead to skipping stitches.
Finally, needle issues play an important role in skipped stitching problems. Incorrectly sized needles may pass through the material without creating a stitch loop; choose needle size according to the thickness of your fabric and thread for the best results.
Even if you’re using a correctly-sized needle, make sure it’s sharp enough for use with delicate fabrics – dull needles create weak threads which break easily leading to skipped stitches. Now that we know more about possible causes of skipped stitching, let’s move on to looking at solutions and remedies related to needle issues and solutions.
Needle Issues And Solutions
When it comes to needle issues, the first thing to check is if you are using the correct size of a sewing machine needle for your fabric and thread. If not, this can cause skipped stitches as well as damage to both the material and the machine.
Also, be sure that the needle eye is clean and free from any lint or debris which could prevent a strong stitch loop from being formed.
The next step is to make sure the needle bar is in alignment with the presser foot – incorrect positioning of a needle bar can also lead to skipped stitching problems.
Finally, make sure you use a good quality needle threader when threading up your machine; an inadequate threader may not pull the bobbin thread through properly causing skip stitches.
On top of all these checks, don’t forget regular maintenance on your sewing machine: cleaning out dust and dirt particles will help ensure smooth operation for years ahead. With a few simple steps we can eliminate many common causes of skipping stitches so let’s move on to looking at how tension settings affect our results.
Thread Tension Causes And Fixes
Thread tension is a crucial factor in maintaining the quality of your stitches, if it’s too tight or too loose this can cause skip stitching. It’s important to keep an eye on thread tension as improper adjustment can result in weak and uneven stitches which won’t hold up under wear and tear. Let’s take a look at what causes incorrect thread tension and how we can fix it.
When working with different fabrics and threads, you need to adjust the needle thread correctly for each project otherwise skipped stitches may occur. If the wrong type of needle has been used then chances are the thread tensions have not been set properly.
Always double-check before beginning a new stitch that both needle type and correct thread tension settings are being applied.
To make sure you get consistent results from your sewing machine, practice using two hands when setting thread tensions: one hand turns the lower looper dial while the other rotates the upper looper dial simultaneously – this will ensure even pull during tightening.
Also, be aware that stretching thin fabrics prior to sewing can also lead to irregular stitch formation so always test out a few samples first!
Achieving balanced tensions between all layers of fabric is key to producing seamless looping and breaking threads – let’s look into some possible causes of these problems now.
Possible Causes Of Looping And Breaking Threads
When it comes to looping and breaking threads, there are a few potential causes that can be identified. The first is the needle thread itself: if too much tension has been applied or inadequate lubrication of the thread has occurred then this could lead to poor stitch formation due to the extra friction created when sewing.
Another factor to consider is the needle plate and shaft; if these components don’t fit snugly together, then skipped stitches may occur as they will be unable to hold onto the fabric securely.
Additionally, make sure you have selected an appropriate presser foot for your chosen material: using one with too high of clearance over the surface of your workpiece might cause skipping stitches as well.
Finally, incorrect settings on your machine’s tension disk – which regulates how tight or loose your upper thread should be – could also account for any irregularities in stitching quality. To avoid this issue always refer back to manufacturer instructions when making adjustments; it’s important to get this right so that consistent results are achieved every time!
How A Dirty Machine Head Contributes To Skipped Stitches
As delicate as a needle may seem, it can quickly become the source of several issues when left unchecked. The dirt and grime that accumulates on the needle’s body, clamp, and thread hole can be especially problematic in causing skipped stitches.
When this happens, even the most experienced sewers find their efforts are for naught; resulting in chaos rather than craftsmanship.
To prevent this from happening, regular maintenance is key! Make sure to inspect all parts of your machine regularly: check if there’s any dirt or debris blocking the needle positions or obstructing its movement.
Also, ensure that you use the right type of needles for different projects – heavier fabrics require stronger needles while lighter materials might fare better with smaller ones. Finally, don’t forget to lubricate any moving components like hooks and shafts; these should be kept clean at all times too!
Overall, ensuring your sewing machine is properly cleaned and maintained will help keep those dreaded skipped stitches away – allowing you to create beautiful garments without interruption!
Reasons For Puckered Seams
Puckered seams are another common issue encountered by sewers. Most often, this is caused by tension issues – the needle thread being too tight or the bobbin thread being too loose. To prevent puckering, it’s important to make sure that both threads have equal tensions.
Additionally, using the correct size and type of needle for your fabric can also help reduce pucker as well; heavier fabrics require stronger needles while stretchy material may need smaller ones.
It is also possible for wrong-size needles to cause puckered seams during sewing projects. If you’re working with thicker fabrics and use a small needle, then chances are high that the stitches will become uneven due to excessive strain on them.
The same goes if you use a large needle on lightweight fabrics – they might pull away from each other when sewn together resulting in unsightly puckers.
In order to achieve consistent results every time, be sure to select the right kind of needle before starting any project! This way, you won’t run into problems like unwanted puckering later down the line. With proper attention paid to tension settings and needle selection, even complex garments can come out looking great without much fuss!
The next section will discuss how impactful not feeding properly can be when it comes to skipped stitches during sewing machine operation.
Impact Of Not Feeding Properly
Making sure that a sewing machine is fed correctly can have an immensely powerful impact on the quality of its stitches. Unwinding threads from wound bobbins, threading needles, and positioning fabric under the needle should all be done with precision to avoid any possible disasters such as skipped stitches!
When not feeding properly, many sewers may find that they are dealing with single-stitch issues or skip stitching. This occurs when the wrong type of needle is used alongside fabrics that require more tension than what it can provide. The result? A skipping of stitches leads to incomplete seams or hems – something no one wants!
The fix for this problem could very well lie in changing up your technique; try taking smaller steps while moving the fabric along and keep checking for proper tension throughout the process. Doing so will help prevent too much strain from being put on the needle which can lead to less-than-ideal results.
And if you’re still facing difficulty then it might just be time to switch up your equipment altogether – opting for heavier-duty machines capable of handling a heavy workload.
Heavy Workload On The Machine
When it comes to sewing, there are some fabrics and projects that require a machine capable of handling more than the usual workload. Heavy layers of fabric as well as the high-quality thread can put a strain on even the best machines out there – leading to skipped stitches if not done properly.
The key here is to make sure you have the right tool for the job! A universal needle will be able to handle thick materials like denim or vinyl while twin needles work great with layered fabrics such as quilting cotton.
It’s also important to consider how many layers of fabric you’re working with; too much bulk can cause tension issues which in turn leads to skipped stitches. If your project requires multiple layers then take some time before starting to ensure everything is aligned correctly and that each layer has been secured firmly. This will help keep things from shifting around during use and reduce any unwanted stitch-skipping problems later down the line.
Finally, don’t forget about proper maintenance practices either! Regularly clean your sewing machine along with its components – this ensures that all moving parts are lubricated and running smoothly without getting clogged up by dust particles or debris. Doing so helps guarantee top-notch results every single time, no matter what type of material you’re using.
With these considerations in mind, avoiding skip stitches should become second nature when creating beautiful garments or textiles at home!
Essential Tips For Avoiding Skipped Stitches
You can’t stitch up a masterpiece without the right tools – this is especially true when it comes to avoiding skipped stitches!
- Sewing needles are essential for any project and should be in good condition
- Dull or worn-out needles can cause skipped stitches and difficulty penetrating fabric
- Check needle position and ensure it’s lined up correctly with the presser foot and feed dogs
- Adjust tension settings appropriately to avoid skipped stitches
- Experiment with different tension settings for different materials and projects
- Ask for help from experienced sewers if necessary
- Stabilize fabrics to prevent shifting and missed stitches
- Use fusible interfacing for thin materials and tear-away backing for heavier fabrics
How To Prepare A Fabric Test Swatch
When it comes to preparing a fabric test swatch for your sewing machine, there are several things to consider.
- Choose an appropriate needle type for the fabric – ballpoint needles for knits, universal and sharp points for woven fabrics.
- Pay close attention to the upper thread and tension settings.
- Create an experimental swatch using scraps of the project’s fabric to test different combinations of needles and tensions.
- Try out different needles and tensions until you find a combination that produces quality results with no skipped stitches or other issues.
- Write down all the details of the ideal needle type and tension settings for the fabric.
- Refer to the notes for future projects to save time and ensure successful results.
Checklist For Changing Needles And Re-Threading The Upper Thread
Changing needles and re-threading the upper thread is an important part of skip stitch prevention. To ensure smooth sewing, it’s essential to make sure that your needle size and type are correct for the project, as well as use a quality thread that will work with the fabric being used. With these considerations in mind, here’s a handy checklist to follow before you start stitching:
- Check what size needle is recommended by your sewing machine manual; this varies depending on the model but typically ranges from 9/70 to 14/90.
- Select the appropriate needle type based on the material – micro tex needles are great for lightweight fabrics like silk or chiffon while stretch needles can handle knits without skipping stitches.
- Make sure you’re using a compatible thread; cotton threads tend to be best with woven fabrics while polyester works great with knits.
- Once everything looks good, double-check all tension settings and make any necessary adjustments.
By following these steps carefully before beginning a project, you’ll be able to avoid common issues such as skipped stitches or pulled threads–resulting in successful projects every time!
Cleaning The Sewing Machine For Skip Stitch Prevention
It’s a good rule of thumb to clean the sewing machine before starting any project. This is an often overlooked step in skip stitch prevention but it should not be! After hours of sewing, lint, and dust can build up inside the machine and cause tension issues or incorrect needle positions that result in skipped stitches. A thorough cleaning every now and then will help ensure perfect stitches every time.
Start by unplugging your machine and opening up the casing with a screwdriver if necessary. Use a vacuum cleaner or soft brush to remove any built-up lint from around the bobbin area as well as along the feed dog teeth.
Don’t forget to check for dust bunnies inside the thread paths too; these can easily get stuck and lead to tension problems down the line (literally!). Once everything looks clear, use compressed air to blow away any remaining debris–just make sure your hands are dry so you don’t shock yourself on any electrical components!
After you’re done cleaning, double-check that all the parts are back where they belong, and plug your machine back in. Finally, adjust tension settings as needed since improper tension can also lead to skipped stitches no matter how clean your machine is. With this final touch, you’ll be ready to start stitching without having to worry about skipping stitches again!
Adjusting Tension Settings As A Final Step
The last step in preventing skipped stitches is to adjust the tension settings on your sewing machine. This may require a bit of trial and error, but it’s worth it for perfect results every time! Here are some tips for adjusting tension:
- Start by re-threading all parts of the machine, including the needle, threader, and bobbin case. Make sure everything is properly aligned before you begin.
- Check that the needle and presser foot pressure are both set to their default positions as well; these can affect stitch formation if they aren’t correct.
- Test different tensions until you find one that works with your current fabric choice–this might mean going through several iterations just to be sure!
- Finally, try out a few stitches on scrap fabric to make sure everything is working correctly. If there’s still skipping or other issues, go back and check your tension again.
Once you’ve fine-tuned your tension settings, you’re ready to start stitching without having to worry about skips! Now let’s look at how damage to the shuttle or bobbin from skipping stitches can occur…
Damage To the Shuttle Or Bobbin From Skipping Stitches
When skipped stitches occur, the damage isn’t just limited to the fabric. The shuttle or bobbin of your machine can take a hit as well. This is because when too much tension or pressure is applied during stitching, it can cause the needle and thread to become caught in the mechanism.
As this happens repeatedly over time, small pieces of metal may be chipped away from the shuttle or bobbin–a real issue for machines that use delicate parts!
Not only does this type of fatigue wear down mechanical components, but it also affects how neatly stitches are formed. If you’re working on intricate projects with specific requirements, such as quilting, these effects will start to become noticeable quickly.
It’s important to make sure all settings are properly adjusted so that no unnecessary strain is put on your machine’s components and stitches remain neat and secure.
Additionally, avoiding skipped stitches helps maintain consistent stitch quality throughout a project; otherwise, details like seam allowance measurements could end up being off-kilter and throw everything else out of alignment. Keeping an eye on tension levels while sewing ensures accurate results every time–so don’t forget to check them before starting any new project!
Why Skip Stitches Matter In Sewing
In sewing, skipped stitches can mean the difference between a finished product that you’re proud of and one that falls flat. Not only do they affect stitch quality, but also fabric integrity and overall durability.
Skipped stitches are especially problematic when creating intricate designs or working with heavier fabrics; if not addressed quickly, these issues can snowball into bigger problems like unraveling seams or tear-outs in the material.
But it isn’t just about aesthetics–skipped stitches pose an even greater safety risk as well. If tension is too loose on your machine while stitching, this can cause weak points to form along seams where threads start to pull out easily over time.
This puts stress on other nearby areas of the garment which could lead to dangerous ruptures or tears during wear. It’s paramount to ensure all settings are properly adjusted before beginning any project so you don’t have to worry about dealing with these types of hazards down the line!
The takeaway here is clear: taking care of your sewing machine by avoiding skipped stitches matters for both aesthetic and practical reasons alike. With proper maintenance and diligent attention to detail, you can sew confidently knowing that each piece will turn out beautifully–and safely–every single time.
Conclusion
It is important to understand the causes of skipped stitches in order to prevent them from occurring. When a sewing machine skips stitches, it can cause major damage and lead to costly repairs or replacements. To keep this from happening, take proper care of your needle, thread tension settings, and the cleanliness of the machine head.
The bottom line is that paying attention to small details matters when it comes to preventing skipped stitches on your sewing machine – with some basic maintenance and troubleshooting tips, you’ll be able to enjoy uninterrupted stitching sessions every time!
FAQs
What is the most common cause of skipped stitches?
The most common cause of skipped stitches is incorrect thread tension. If the tension is too tight, the needle may skip stitches; if it is too loose, the stitches may be uneven. Other causes include improper needle size or type, poor quality thread, incorrect machine settings, and worn or damaged needles.
What causes irregular stitches on sewing machine?
Irregular stitches on a sewing machine can be caused by a number of things, including incorrect thread tension, incorrect needle size, incorrect threading, incorrect bobbin winding, a dull needle, or a damaged presser foot. It can also be caused by a machine that is out of alignment or that needs to be cleaned and oiled.
What tension should my sewing machine be on?
The correct tension setting for a sewing machine varies depending on the type of machine and the fabric you are working with. Generally, the recommended tension setting for most machines is 4-5. However, you should refer to your sewing machine’s manual for the correct setting for your particular machine and fabric.
How tight should bobbin tension be?
Bobbin tension should be tight enough that the thread passes through the tension discs with a slight resistance, but not so tight that it creates too much drag.
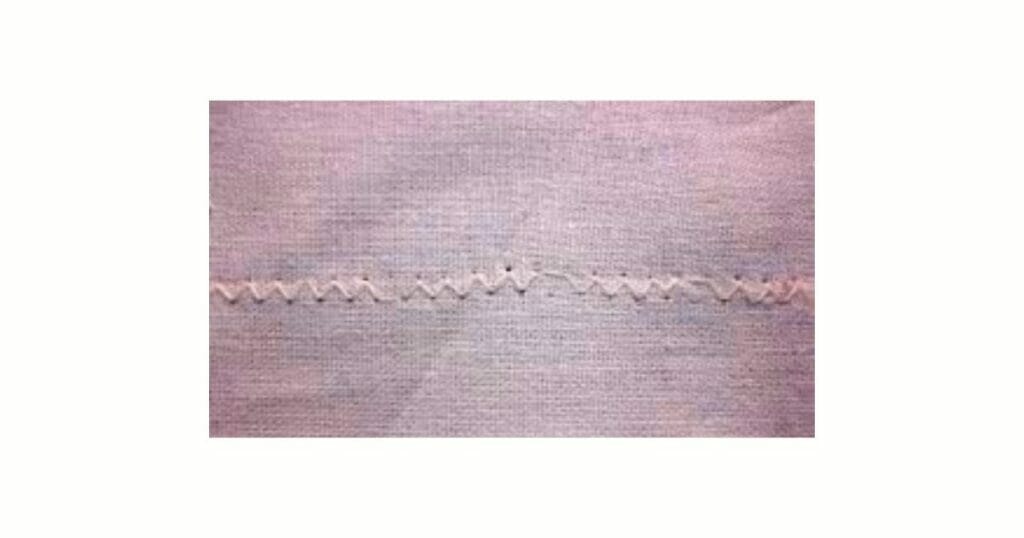
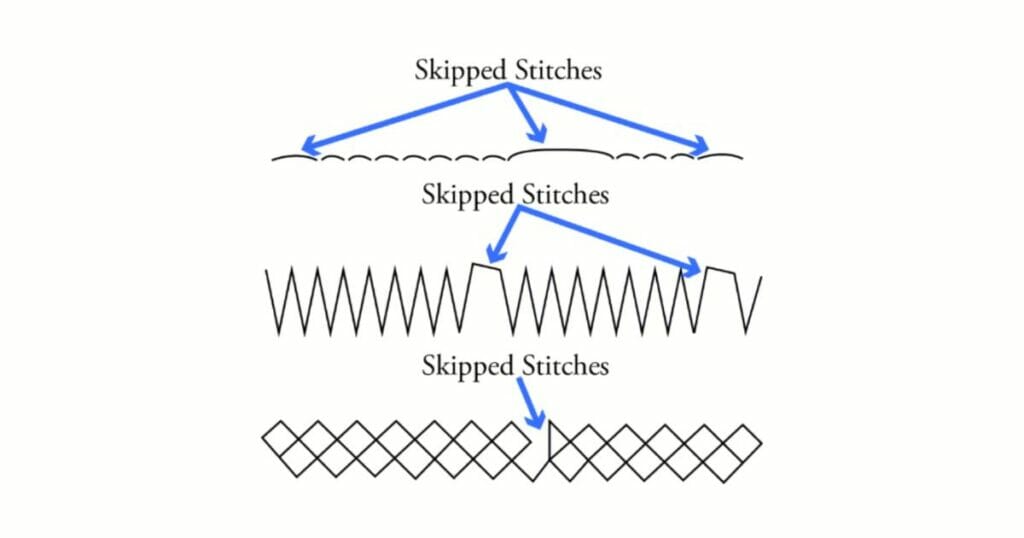
What is skip stitch defect?
Skip stitch defect is an irregularly spaced stitch that appears in a fabric or garment due to a skipped needle or a missed stitch. It can occur in any type of stitching and is usually caused by a broken or damaged needle, incorrect tension settings, or incorrect threading. It can also be caused by the fabric or garment snagging or stretching, or by operator error.
How do you fix uneven stitches?
To fix uneven stitches, start by unpicking the stitches to the point where the unevenness begins. Then, you can re-stitch the area using the same stitch pattern, making sure to keep the tension even and consistent. If the uneven stitching is due to tension issues, try holding the yarn a little looser when stitching, or use a larger needle size.
