

If you’re a sewer, chances are you’ve invested in a good-quality sewing machine that provides stitches of superior quality. And if you’re planning to move, then you’ve probably started to think about how you’ll pack your sewing machine.
Packaging materials alone aren’t enough. If packing up your precious fabric collection was easy, then so should packing up your sewing machine – but it’s a tricky question.
Safety is one essential factor when packing up a sewing machine: safety! In this article, I will share with you the best practices on how to pack a sewing machine for moving.
Related Topic: How To Store A Sewing Machine (Safe Solutions)
Preparing to Pack a Sewing Machine
Before packing up your sewing machine, it is important to take the necessary steps to ensure that it is properly prepared for transport.
First, make sure that the machine is unplugged and all cords are disconnected. Next, remove any attachments or accessories from the machine and place them in a separate container.
Gather the Necessary Supplies
Once you have prepared your sewing machine for packing, it is time to gather the necessary supplies. You will need a sturdy cardboard box that is large enough to fit your sewing machine, packing materials such as bubble wrap and packing peanuts, and tape or other adhesives.
Make sure that the box is strong enough to protect your machine during transit and that all of the materials are non-abrasive so they won’t damage the delicate parts of your machine.
Additionally, you may want to include a few extra items such as labels or markers in case you need to identify any of the components during unpacking.
Clean and Disassemble the Sewing Machine
Before packing your sewing machine, it is important to clean and disassemble it. Start by removing any attachments or accessories from the machine and placing them in a separate container.
Then, use a damp cloth to wipe down the exterior of the machine and remove any dust or debris that could cause damage during transit.
Finally, if possible, disassemble the sewing machine into its component parts so that each piece can be individually wrapped for added protection. This will help ensure that all components remain safe and secure during transport.
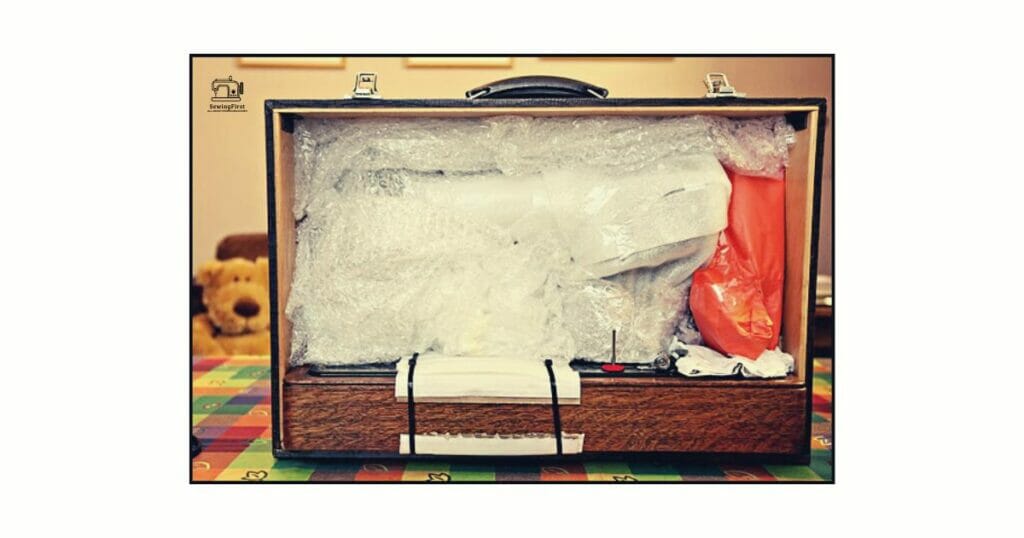
Securely Wrap and Pad the Parts
Once you have disassembled the machine, it is time to securely wrap and pad each part. Start by wrapping each component in several layers of bubble wrap, making sure that all edges are securely sealed.
Then, place the machine itself in a layer of bubble wrap and secure it with tape or other adhesives. Finally, place any loose items such as the foot pedal or power cord in a separate container and pad them with packing peanuts or other materials for added protection.
Place Parts in the Box with Careful Arrangement
When placing the parts in the box, it is important to arrange them carefully. Place any fragile items such as the presser foot or power cord at the bottom of the box and make sure that they are securely wrapped and padded.
Additionally, you may want to add extra padding between each component to prevent them from shifting during transit. Once all of the pieces are arranged in the box, seal it up with tape and label it clearly so that you know what is inside when unpacking.
Fill Empty Spaces with Packing Material
Once all of the components are arranged in the box, it is important to fill any empty spaces with packing material. This will help keep the parts secure and prevent them from shifting during transit.
Start by filling any gaps between the parts with packing peanuts or foam sheets. Additionally, you may want to add some of the original packing material that came with your sewing machine for extra protection.
Finally, make sure that all of the components are tightly packed together so that they won’t move around during transport.
Securely Tape the Box to Close
Once all of the components are securely arranged in the box, it is time to close it up. Start by taping the top and bottom flaps of the box together with strong packing tape. Make sure that all edges are securely sealed so that nothing can come loose during transit.
Additionally, you may want to reinforce any weak spots on the box with extra tape for added protection. Finally, label the box clearly with your name and contact information so that it can be easily identified when unpacking.
Label and Store the Box
Label and store the sewing machine box for moving by first finding a designated sewing space in your new home. This could be a room, closet, or even corner of a larger space, or even another place outside your home.
Once you have identified where you will be keeping your sewing machine, take the time to label the box with the words “sewing machine” and any other important information, such as the brand and model number.
This will make it easier to locate the box when you are unpacking and setting up your sewing space. When it comes time to move, make sure to properly secure the sewing machine box with tape or straps to prevent it from shifting during transport.
This will ensure that your sewing machine arrives at its new home in good condition, ready for use in your new sewing space.
How to Pack a Sewing Machine for Shipping?
Packing a sewing machine for shipping requires time and patience for a successful shipment. To ensure your sewing machine is safe, it’s important to use the right materials and methods. Start by finding the original packaging the machine came in and use it if it’s still in good condition.
If not, use a sturdy cardboard box with plenty of padding. Make sure to wrap the machine securely with packing material such as bubble wrap and packing peanuts. Label the box as “Fragile” and fill out any necessary paperwork for shipment.
Finally, double-check that the box is securely sealed and place it in a larger box for extra protection. With these steps, your sewing machine will be safe and ready for shipment!
How to Pack a Sewing Machine For a Flight?
Packing your sewing machine for a flight can be a daunting task. You want to be sure your machine is protected, but also that it meets the airline’s requirements. Here are some tips to help make sure your machine arrives safely.
- Make sure to bubble wrap or use a padded bag for your machine. If you don’t have a bag, you can buy one or make one with some thick fabric and bubble wrap.
- Remove any loose parts and accessories and pack them separately. This includes the power cord and any embroidery hoops or feet. Be sure to include a separate label for each item.
- Check the airline’s regulations for carrying a sewing machine on board. Some airlines may require the machine to be in a hard-sided case.
- Once you’ve packed your machine, check that it is secure and will not move around in the bag.
Following these tips should help ensure that your sewing machine arrives safe and sound at your destination. Enjoy your flight, and happy sewing!
Tips on How to Pack a Sewing Machine For Moving
- Wrapping your sewing machine in bubble wrap will help to protect it from scratches, dents, and other damage during the moving process. Be sure to carefully wrap the machine in a single layer of bubble wrap, leaving no areas exposed.
- In addition to bubble wrap, you may want to consider using additional packing materials, such as foam sheets or boxes with peanuts, to further protect your sewing machine during the move. These materials will help to absorb any shock or impact that may occur during transport.
- If your sewing machine has any sharp objects, such as needles or scissors, make sure to properly cover or remove them before packing the machine. This will help to prevent any accidental injuries or damage during the move.
- Consider purchasing insurance for your sewing machine in case of any unexpected damage during the move. This will give you peace of mind and allow you to make an insurance claim if necessary.
Conclusion
In conclusion, packing a sewing machine for moving requires careful planning and attention to detail to ensure that the machine is protected during the move and arrives at its new location in good working condition.
Some key steps to follow include gathering the necessary materials, such as a sturdy box and packing materials, unplugging the machine and removing any attachments, securing loose parts, and cushioning the machine with packing materials.
By following these steps and handling the machine with care, you can successfully pack and transport your sewing machine to its new home.
FAQs
How do you package a sewing machine?
To package a sewing machine, gather a sturdy box and packing materials, unplug the machine and remove any attachments, secure loose parts, and cushion the machine with packing materials.
What should you not do when packing?
When packing a sewing machine, you should avoid leaving loose parts inside the machine, neglecting to unplug the machine, and failing to use sufficient packing materials to protect the machine during the move. It is also important to handle the machine with care to avoid damaging it.
How do you pack a sewing machine for a flight?
Pack a sewing machine for a flight, This includes gathering the necessary materials, unplugging the machine and removing any attachments, securing loose parts, and cushioning the machine with packing materials.
You should also consider purchasing a hard-side suitcase specifically designed for transporting a sewing machine. This will provide additional protection for the machine during the flight.
Can I take a sewing machine in my hand luggage?
It is generally not recommended to take a sewing machine in your hand luggage when flying, as they are typically too large and fragile to be transported safely in this manner.
Instead, you should pack the sewing machine in a checked suitcase or shipping box, and check with the airline to see if they have any specific guidelines or restrictions for transporting sewing machines
Can you lay a sewing machine on its side?
Yes, you can lay a sewing machine on its side. However, it is important to make sure that the machine is protected from damage when doing so. It is also important to make sure that the machine is in a stable position so that it does not tip over.
