Sewing machines are essential tools for anyone who wants to make clothes or other fabrics. However, all too often they can become misaligned and, as a result, their timing is thrown off. This can be incredibly frustrating and lead to garments that don’t look quite right.
Fortunately, there’s no need to despair – with the right techniques, you can quickly get your sewing machine back in tune and produce great results!
In this article, we’ll walk through exactly how to fix sewing machine timing so that you can keep creating beautiful pieces of clothing without interruption. We’ll provide step-by-step instructions suitable for sewers of any level so that everyone can benefit from this knowledge. So let’s dive in and get started on mastering this skill!
Related Topic: How to Get Broken Needle Out of Sewing Machine: Welcome to the Club!
Disassembling and Inspecting the Sewing Machine
Diving into the inner workings of a sewing machine can be both daunting and rewarding. It’s like diving into the depths of an ocean, where you have no idea what type of mysterious creatures you might discover! Fixing the timing in your own machine is an empowering experience that requires skillful hands and some detective work.
To begin, disassemble the machine to gain access to the needle bar and needle plate. This means unscrewing various pieces such as screws or clamps to free up these components for inspection. When examining these parts look out for any signs of wear on the hook gears, bobbin hook, and needle bar clamp.
This could indicate what has caused your machine to malfunction over time. Make sure all moving parts are properly aligned with each other to ensure they move without obstruction when reassembling your machine.
Using specialist tools if necessary, check that everything is connected correctly so it will run smoothly once switched back on. Double-check every connection before putting it all back together again since incorrect assembly can cause further damage. Once complete, switch on the power button and watch as your beloved sewing machine comes alive once more!
The Direction Of Hook Rotation
When it comes to sewing machine timing, many people may assume that disassembly is the only way to fix any issues. But in fact, understanding and adjusting the direction of your hook rotation and hook timing are key parts of keeping your machine running smoothly.
The sewing machine hook is connected to the needle bar at an angle that determines how quickly or slowly the needle will move up and down. When this angle isn’t properly adjusted, it can cause problems with stitch formation, tension control, and other aspects of stitching quality.
To ensure correct timing adjustments are made, you need to know precisely how the needle should be moving relative to the position of the hook.
To do this, check that when viewed from above – as if looking directly into the throat plate -the tip of the hook should just slightly pass over the top of the eye on each revolution. If this relationship appears normal then no further action needs to be taken;
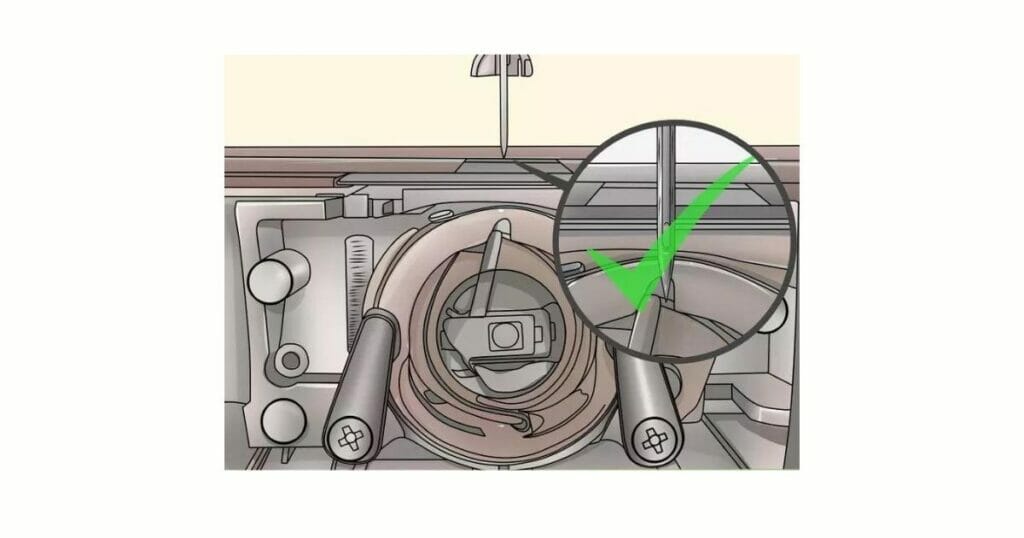
however, if there’s a gap between them then certain changes must be implemented in order for accurate timing adjustments to take place.
Inspecting the alignment between your sewing machine hook and needle eye can help you identify potential causes for poor performance and keep your projects seeming smooth and professional. By following these simple steps, you’ll have all you need to maintain precision timing…and get one step closer to mastering your craft!
Hook Tip Vs Needle Eye
The hook tip and needle eye can be compared to two dancers in a synchronized performance – one misstep and the whole show is thrown off. If your sewing machine’s timing isn’t just right, it could mean that its hook tip vs needle eye relationship has gone astray.
When this happens, there are several things you have to examine before you can fix the problem. Needle timing needs to be checked first – if it’s out of whack, then you need to adjust it accordingly. Then you’ll want to check the needle bar height as well as hook-to-needle timing for any discrepancies or inconsistencies.
If all these elements aren’t lining up correctly, then it won’t matter how much adjustment you do elsewhere; without proper hook tip vs needle eye alignment, everything else will remain off balance.
So take time to evaluate each component thoroughly by following the correct steps and making sure they are properly aligned so that your machine runs smoothly again!
TIP: Make sure when adjusting your machine’s hook tip vs needle eye alignment that both components move together at an even speed during your tests. This way, you’ll know whether or not their rhythm is in harmony with each other!
Drive Shaft Bushing
Have you ever been in the middle of a sewing project, only to find that your machine’s timing is off? If so, it can feel like an overwhelming task to try and figure out what has gone wrong. Fortunately, drive shaft bushing could be the answer you’ve been searching for!
When it comes to fixing your sewing machine timing, the needle position is determined by the timing bar bushing which is connected to the drive shaft bushing. This small part plays an essential role in ensuring that needles move up and down at regular intervals as they should. I
If this piece isn’t working correctly or if it becomes worn over time, then your needle won’t stay put — resulting in incorrect stitching patterns.
Fortunately, replacing a faulty drive shaft bushing isn’t difficult when you have the right tools and knowledge. By following some simple instructions on how to remove and replace this part, you can make sure that your needle stays in its correct position again – making all the difference when trying to achieve professional results with your next sewing project!
With these steps complete, all that remains is testing out whether everything works properly – starting with checking if your needle moves up and down smoothly and accurately into its correct positions throughout multiple stitches.
Tools Required for Fixing the Sewing Machine
The sewing machine is a symbol of creativity and the ability to transform fabric into something beautiful. It’s no wonder that when our beloved machines become out of sync, we feel frustrated and helpless. But fear not! With the right tools and some know-how, you can fix your sewing machine timing with ease.
You’ll need needle eye screwdrivers, flathead screwdrivers, feed dogs for straight stitch machines, and base covers in order to properly adjust the timing on your machine. These are all fairly easy to find online or at local craft stores. Once you have these items in hand, it’s time to get started adjusting the timing on your sewing machine.
To begin this process, make sure that everything is disconnected from power sources so that you won’t be shocked while fiddling around inside the device. Then carefully remove any screws holding down the base cover to reveal what’s beneath it.
From here, take out each part one by one until you’ve reached the drive shaft bushing – this will tell you if there are any issues with its synchronization or alignment. After making necessary adjustments, put everything back together again and test it out before putting away your tools.
Adjusting The Timing
Adjusting the timing of a sewing machine is like playing a game – you need to get all parts in perfect alignment. It’s not an impossible task though, with some patience and practice it can be done easily. Here are four things that will help you make sure your straight stitch is spot on
- Make sure the feed timing between the needle bar and presser foot is correct;
- Check if the needle height has been adjusted correctly;
- Ensure that the bobbin case is properly aligned;
- Double-check for any tension issues.
Once these settings have been taken care of, run a few test stitches on scraps of fabric to check for accuracy. If everything looks good, adjust the pressure so that both sides are even when stitching through multiple layers of fabric. This will ensure that the top thread feeds evenly throughout each seam without causing bunching or skipped stitches.
Finally, inspect every inch of your work carefully as an uneven stitch pattern could mean something still needs tweaking in order for your machine to perform at its best. Keep adjusting until it’s just right – then go forth and sew!
Checking The Hook
Checking the hook of your sewing machine is a crucial step in fine-tuning its timing. To begin, you’ll need to make sure that the bobbin thread is properly inserted and wound through the needle shaft. It’s important to ensure that it’s not too tight or tangled – if this happens, gently remove the thread and try again.
Once all of these elements are working together correctly, check to see whether the center needle position appears correct when compared against any diagrams provided by the manufacturer. If it looks off even slightly, take some time to adjust it until it matches up with what’s shown on the screen. And for those using double needles? Don’t forget about making small adjustments as needed – however slight they may be!
Finally, don’t be afraid to change out needles from time to time if you’re ever in doubt; sometimes just swapping one type for another can have an immediate effect on how smoothly your machine runs. With a few careful checks and tweaks here and there, you should soon be able to get things back into alignment – so let’s move on to trying out a few trial runs!
Trial And Error
It is possible to fix sewing machine timing through trial and error. This theory can be tested by first ensuring that the needle, switch plate, and dedicated center needle position are all at the correct distance from one another.
After this has been verified, then a repair person might suggest lubricating the parts with sewing machine oil as an additional step of maintenance.
The next step would involve examining if any other components may need adjustment or replacement due to wear and tear over time.
A visual inspection should reveal what needs replacing or fixing so that it runs efficiently again. If this doesn’t work, then further troubleshooting will have to take place such as potentially changing out the entire motor or wiring set-up entirely.
Ultimately, success depends on how well adjustments were made for each part throughout the process – especially when taking into account how much experience the technician has worked on similar projects before.
Getting it right requires patience and concentration because even small mistakes could throw off its balance completely. With these tips in mind, anyone can get their sewing machines back up and running again!
Diagnosing And Fixing The Problem
Tackling a broken sewing machine can be like navigating through an uncharted wilderness; you’re never quite sure how to get where you need to go. But with the right tools and understanding, diagnosing and fixing the problem can become much simpler.
When it comes to timing issues on a sewing machine, one of the first things to do is locate the lowest position for your needle. This dedicated center needle position will provide you with an idea of where the needle should stop when moving up or down at its highest speed.
Once located, start by testing if the damn needle positions properly when set in its lowest position. If not, then it’s time to move on to examining components such as drive belts and tension systems that may have been damaged due to overuse or wear and tear.
You might also want to make sure that your industrial-size needle isn’t too small for your machine’s specifications – this could cause problems with your fixed sewing machine timing. Once all possible causes have been examined, now would be the perfect time to begin making adjustments until the timing is restored back to normal levels.
With patience and dedication, it is only a matter of time before everything falls into place. By following these steps, even someone who has little knowledge about machinery can repair their own malfunctioning sewing machine!
Tips For Timing Industrial Sewing Machines
Industrial sewing machines are complex machines with intricate timing. When the timing is off, it can cause major issues and delays in production. For example, a clothing company that relies on its industrial sewing machine to make 1000 pieces of clothing per hour might have its orders delayed if the machine’s timing gets out of sync.
In order to fix this issue as quickly and efficiently as possible, there are some simple steps you can take to time your industrial sewing machine.
- Check that all moving parts like belts or gears are properly aligned and tensioned according to manufacturer specifications. This will ensure they don’t slip while running and throw off the timing of the entire system.
- You should inspect any electrical components for signs of wear or damage which could prevent them from working correctly.
- Adjust any settings related to speed control or stitch length so that they match what has been programmed into the machine.
These steps may seem daunting at first but once you get familiar with how your particular model works, it becomes second nature and makes maintenance much easier in the long run.
Taking these precautions regularly not only keeps your industrial sewing machine running smoothly but also helps avoid potentially costly repairs down the line due to improper timing or mechanical errors.
By taking proper preventive measures and understanding how different elements affect one another within an industrial sewing machine’s assembly, we can easily maintain our machines’ optimal performance over time—which will save us both money and stress in the future!
How To Fix The Timing On A Sewing Machine Yourself
Tackling a sewing machine’s timing can be daunting, like trying to untangle an intricate knot. But with just a few simple steps, you’ll soon have the confidence and skill needed to keep your stitches looking perfect!
It’s possible to fix the timing of your sewing machine yourself – no special tools or knowledge is required. All it takes is patience and attention to detail as you adjust each component that makes up the overall mechanism. With practice, you’ll become an expert in making sure everything is ticking along smoothly.
Once you understand how all the parts work together, adjusting the timing becomes second nature. Taking apart and putting back together your machine will give you a newfound appreciation for its inner workings and help make every stitch look flawless!
How To Adjust Sewing Machine Timing
Have you ever noticed your seams coming out uneven, or stitches that are off balance? It can be a sign that the timing of your sewing machine is off. Adjusting the timing on your own may seem intimidating, but with some practice and patience, it’s not as hard as it looks!
Believe it or not, adjusting the timing of your sewing machine is actually quite simple – all you need to do is turn the hand wheel until all parts are in proper alignment.
First, locate the needle bar and make sure it’s properly aligned with its moving parts – if it’s not, simply loosen one end of the screws at either side of the needle bar and reposition them accordingly. Then move on to checking for any loose connections within the hook race.
Once everything seems secure, gradually turn the hand wheel clockwise until you hear a clicking sound from inside- this indicates that all gears have been set into place correctly.
This process may take multiple attempts before getting right – an easy way to check whether your adjustments have made a difference is by running a few test stitches.
If they look neat and even compared to previous results then congratulations – you have successfully adjusted the timing on your sewing machine! With just a little bit of knowledge and effort, soon enough you’ll become an expert in making small repairs like these yourself…allowing you to tackle larger projects without feeling overwhelmed or intimidated any longer!
How Do I Know If My Timing Is Off On My Sewing Machine?
Mary had been a seamstress for over 15 years. Her sewing machine was her trusty sidekick throughout it all, but lately, she noticed something strange: the timing seemed off. She wasn’t sure how to tell if the timing was indeed off so she searched online for answers.
There are several ways to check whether or not your sewing machine’s timing is out of whack.
- Make sure that you have correctly threaded both the top and bottom tensions on the machine; incorrect tension settings can throw everything else off balance.
- Look at where the needle enters into the fabric when stitching; if each stitch isn’t consistent in size then it could be due to an incorrect timing setting.
- Listen closely as you sew – does it sound uneven? If yes, then chances are there’s a problem with its timing.
These tips should help Mary (and everyone else) determine if their sewing machine needs to be adjusted in order to get back on track – but what about cost?
How to Fix Sewing Machine Timing: The Fixing Cost
It’s a common assumption that having your sewing machine timing fixed is an expensive job. However, the truth is that it can actually be quite affordable. Depending on where you go and who you ask to do the work, fixing the timing of a sewing machine could cost anywhere from nothing at all up to around $50-$100 dollars in most cases.
Of course, if any replacement parts are needed then this will increase the price. Sometimes, if the problem is particularly complex or due to a fault within the motor itself, then more money may need to be spent on labor costs too. But for simple problems with no major underlying issues, getting your timing back on track shouldn’t break the bank.
The question now becomes: what causes a sewing machine to get out of time? In order to answer this properly we must first understand how important it is for a sewing machine’s mechanical components to remain perfectly synchronized.
What Causes A Sewing Machine To Get Out Of Time?
When it comes to repairs, a sewing machine is one of the most common pieces of equipment that can get out of time.
For example, Mary had been using her sewing machine for years when she noticed that her stitches weren’t coming out as straight or evenly spaced as before. Upon closer inspection, Mary realized her machine was off its timing and needed to be fixed.
What causes a sewing machine to get out of time? It could be due to a few different factors such as
Worn parts
If your sewing machine has been used frequently over time, then some parts may have become worn down and need replacing in order for it to run smoothly again. This includes tension discs, needles, presser feet, and feed dogs.
Improperly adjusted settings
The timing on a sewing machine can also go awry if you’ve made any adjustments to the stitch length without properly adjusting the top thread tension. Or if you haven’t correctly aligned the bobbin case with the needle plate when re-installing it after cleaning up lint inside the hook assembly area underneath.
Power surges
Sewing machines are sensitive electrical devices so they’re vulnerable to power surges which can cause them to malfunction and throw their timing off balance too.
Fortunately, there’s plenty of help available online from tutorials about how to adjust the settings yourself all the way through professional repair services who can fix even complex issues with timed mechanisms like this quickly and efficiently – whatever fits your needs best!
Conclusion
The importance of having your sewing machine timing correctly set cannot be overstated. Adjusting the timing on a sewing machine can save you time, money, and frustration when it comes to completing projects. Knowing how to adjust the timing yourself gives you full control over this essential aspect of using your machine properly.
In conclusion, fixing the timing of your sewing machine isn’t something that should be taken lightly; however, with proper knowledge and preparation, it doesn’t have to be an overwhelming task either. With patience and attention to detail, you’ll soon find yourself in complete control of one of the most important elements of maintaining a successful sewing experience!
FAQs
What causes a sewing machine to go out of timing?
The most common cause of a sewing machine going out of timing is the incorrect adjustment of the timing components such as the needle bar or the hook assembly. Other causes can include the machine being dropped or bumped, the needle being bent or otherwise damaged, or the gears or belts slipping.
How much does it cost to fix a sewing machine timing?
The cost of fixing a sewing machine timing can vary greatly depending on the machine, the type of work required, and the technician doing the work. In general, you can expect to pay anywhere from $50 to $200 for timing repairs.
What is sewing machine hook timing?
Sewing machine hook timing is the process of adjusting the timing between the rotating hook and the needle. This process ensures that the bobbin thread is picked up by the needle at the right time. The timing should be adjusted if the machine is skipping stitches or if the bobbin thread is not being picked up.
How do you fix a sewing machine that skips?
1. Check the needle: Make sure the needle is installed correctly and is the correct size for the fabric and thread you are using.
2. Check the tension: Make sure the tension settings are correct for the fabric and thread you are using.
3. Clean the bobbin area: Remove the bobbin from the sewing machine, then use a brush or vacuum to remove any lint or dust from the bobbin area.
4. Oil the machine: Use an oil specifically designed for sewing machines and lubricate all moving parts.
5. Check the feed dogs: Make sure the feed dogs are raised and in the correct position for the fabric you are using.
What is the average lifespan of a sewing machine?
The average lifespan of a sewing machine is approximately 8-10 years.
What causes a sewing machine not to stitch?
1. The needle is not properly inserted or the wrong size needle is being used.
2. The thread is not properly threaded through the machine.
3. The bobbin is not loaded correctly or the bobbin tension is incorrect.
4. The presser foot is not in the correct position.
5. The machine is not properly lubricated.
Why is my sewing machine not moving fast?
There are several possible reasons why your sewing machine might not be moving fast. Some possible reasons include a clogged bobbin case, a damaged drive belt, incorrect thread tension, incorrect needle size or type, a worn needle plate, a broken feed dog, or a malfunctioning motor.
How do you adjust the timing on a rotary hook?
The timing on a rotary hook must be adjusted by an experienced technician or electrician. There are a few steps to adjusting the timing:
1. Loosen the screws that secure the top cover of the rotary hook.
2. Loosen the screws that secure the lower cover.
3. Loosen the screw that secures the timing pin.
4. Turn the timing pin clockwise to increase the timing, or counter-clockwise to decrease the timing.
5. Tighten the screws that secure the top and lower covers.
6. Test the timing by running the machine and observing the stitching.
7. If necessary, repeat steps 4-6 until the timing is set correctly.
What is the normal tension setting on a sewing machine?
The tension setting on a sewing machine will vary depending on the type of machine and the type of thread being used. Generally, the recommended tension setting for most machines is between 4 and 5