
Are you a beginner sewer who’s tired of using rulers or gridding tape to measure out your seam allowances? Do you wish there was an easier way to find 1/4 inch on your sewing machine?
Finding 1/4 inch on your sewing machine isn’t hard if you know what to look for. You just have to know how to read the lines and understand a few features that most sewing machines have in common.
In this article, I’ll show you step-by-step how to find 1/4 on a sewing machine. I’ll share tips for different types of stitches and provide an easy understanding of seam allowances so that you can tackle almost any project with confidence!
Related Topic: What Does E6 Mean on a Brother Sewing Machine? The Essential Breakdown
What Is a ¼ Inch Seam Allowance?
A ¼ inch seam allowance is the distance between the edge of your fabric and the stitching line. It is important to use a consistent seam allowance when sewing, as this will ensure that all of your seams are even and uniform.
Seam allowances can vary depending on the type of stitch you are using, but a ¼ inch seam allowance is generally considered standard for most projects. When measuring out your seam allowances, it’s important to make sure that they are accurate so that your finished project looks professional and polished.
How to Find 1/4 inch on Sewing Machine
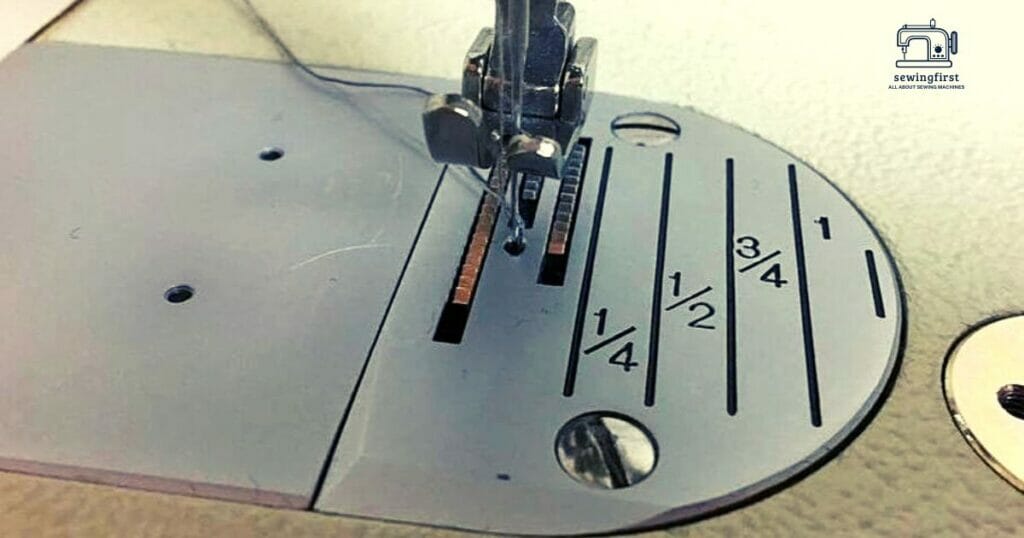
Finding 1/4 inch on a sewing machine is easy if you know what to look for. Most machines have a seam allowance guide that will help you measure the correct distance. To find 1/4 inch, simply line up the edge of your fabric with the 1/4 inch mark on the guide and then stitch along that line.
You can also use the needle plate as a guide by lining up the edge of your fabric with the left side of the needle plate and then stitching along that line.
Additionally, many machines come with a ¼ inch foot which makes it even easier to get an accurate seam allowance every time. With practice and patience, you’ll be able to find 1/4 inch on your sewing machine in no time!
Benefits of Using a ¼ Inch Seam Allowance
- Accurate Seams: Using a ¼ inch seam allowance ensures that all of your seams are even and uniform, giving you professional-looking results every time.
- Easier to Measure: Finding 1/4 inch on your sewing machine is much easier than using rulers or gridding tape, saving you time and effort.
- Durable Results: A ¼ inch seam allowance gives your projects extra strength and durability, making them last longer.
- Consistent Fit: With a consistent seam allowance, you can be sure that all of your pieces will fit together perfectly when finished.
- Professional Look: By using the correct seam allowances, you can create garments and other projects that look polished and professional.
Setting Up Your Sewing Machine for a ¼ Inch Seam Allowance
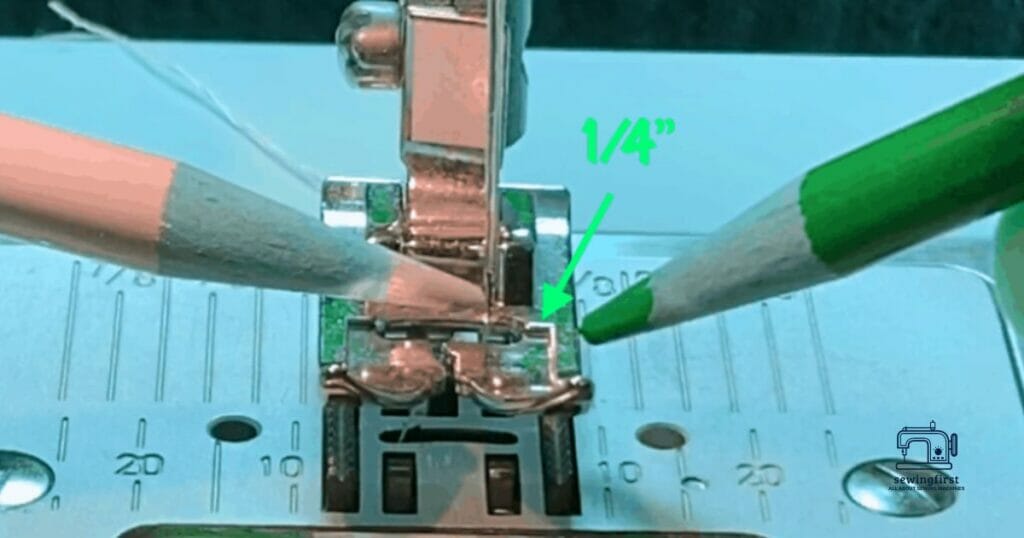
Step 1: Start by adjusting the needle position on your sewing machine. Most machines have a dial or lever that allows you to move the needle from side to side. Move the needle so that it is lined up with the ¼ inch mark on the seam allowance guide.
Step 2: Next, attach the ¼ inch foot to your machine. This foot will help you keep an accurate seam allowance as you sew. Make sure that it is securely attached and that it is lined up with the needle and seam allowance guide.
Step 3: Now, adjust your stitch length so that it is set at 4 stitches per inch (or 10mm). This will ensure that your seams are even and uniform when finished.
Step 4: Finally, test out your settings by stitching a few lines of fabric together. If everything looks good, then you’re ready to start sewing! Conclusion
Measuring the Seam Allowance on Your Sewing Machine
Measuring the seam allowance on your sewing machine is an important step in creating professional-looking garments and other projects. To ensure that you get a consistent seam allowance every time, it’s important to understand how to measure it correctly.
The first step is to attach the presser foot of your choice to the machine. This will help guide your fabric as you sew and make sure that your seams are even.
Next, line up the raw edge of your fabric with the left side of the presser foot and then stitch along that line using a straight stitch. As you sew, make sure that the feed dogs are lined up with the edge of your fabric so that they can help guide it through evenly.
Once you have stitched a few strips of fabric together, measure them with a ruler or tape measure to check for accuracy. You should be looking for a scant quarter inch seam allowance, which means that there should be just enough room between each stitch for a quarter-inch measurement.
Testing the Seam Allowance with Scrap Fabric
Testing the seam allowance with scrap fabric is an important step in creating perfect seams. Before you begin sewing on your project, it’s important to test the seam allowance on a piece of scrap fabric. This will help ensure that you get the right size and accuracy for your seams.
To start, attach the seam foot of your choice to your machine and line up the raw edges of your fabric with the left side of the presser foot. Then stitch along that line using a straight stitch, making sure that the feed dogs are lined up with the edge of your fabric so that they can help guide it through evenly.
Once you have stitched a few strips of fabric together, measure them with a ruler or tape measure to check for accuracy. You should be looking for a scant quarter inch seam allowance, which means that there should be just enough room between each stitch for a quarter-inch measurement.
To further test your seam allowance, sew two strips of fabric together and then cut them down the center strip to create two separate pieces. Measure each piece individually to make sure that they both have an accurate seam size and are even in width throughout.
Adjusting the Needle Position to Achieve a ¼ Inch Seam Allowance
Adjusting the needle position to achieve a ¼ inch seam allowance is an important step in creating professional-looking garments and other projects. To ensure that you get a consistent seam allowance every time, it’s important to understand how to adjust your needle position correctly.
The first step is to thread the machine with two thread tails of equal length. This will help keep the tension even throughout your stitching and make sure that your seams are even. Next, attach an adjustable seam guide or attachable seam guide to the presser foot of your sewing machine. This will help guide your fabric as you sew and make sure that your seams are even.
Once you have attached the adjustable or attachable seam guide, adjust the needle position so that it is set at ¼ inch from the edge of the fabric. This will ensure that you get a consistent ¼ inch seam allowance every time you stitch. If you have a heavy duty sewing machine, you may need to adjust the needle position manually by turning a dial or knob on the side of the machine.
Finally, test out your settings by stitching a few lines of fabric together.
Tips for Maintaining an Accurate ¼ Inch Seam Allowance
- Use a magnetic seam guide to ensure that you get an accurate ¼ inch seam allowance.
- Aim for a scant seam allowance, meaning that there should be just enough room between each stitch for a quarter-inch measurement.
- Align the raw fabric edges with the left side of the presser foot and stitch along that line using a straight stitch.
- Make sure to mark your seam lines by drawing a horizontal mark on the fabric closest to the edge of the presser foot.
- To double-check accuracy, use a piece of graph paper and draw horizontal marking lines at ¼ inch intervals.
- To ensure accuracy, use a seam ripper to remove any stitches that are too close or too far away from the edge of the fabric.
- If you’re using a heavy-duty machine, adjust the needle position manually by turning a dial or knob on the side of the machine.
- When stitching multiple layers of fabric together, use a walking foot to help keep the layers even and the seam allowance consistent.
- When stitching multiple layers of fabric together, use a walking foot to help keep the layers even and the seam allowance consistent.
- To ensure accuracy, use a seam ripper to remove any stitches that are too close or too far away from the edge of the fabric.
- Use a ruler or tape measure to check for accuracy after stitching each seam.
Conclusion
In conclusion, a ¼ inch seam is one of the most common and important stitch lengths when sewing. Knowing how to find the exact spot can be difficult but with some practice and guidance, you will be able to master it in no time.
Make sure you practice with your machine first before starting any project so you know exactly how to find the ¼ inch mark accurately. With a little patience and dedication, you can easily master this skill and become a pro-sewer!
FAQs
How do you measure 1/4 seam allowance on a sewing machine?
To measure a 1/4 inch seam allowance on a sewing machine, first, attach an adjustable or attachable seam guide to the presser foot of your machine. Then adjust the needle position so that it is set at ¼ inch from the edge of the fabric.
How do you measure 1/4 seam allowance on a Singer sewing machine?
To measure a 1/4 inch seam allowance on a Singer sewing machine, first, attach an adjustable or attachable seam guide to the presser foot of your machine. Then adjust the needle position so that it is set at ¼ inch from the edge of the fabric.
Where is the 1/4 seam allowance?
The 1/4 inch seam allowance is the distance between the edge of the fabric and the needle on your sewing machine. To measure this accurately, use a ruler or tape measure to check for accuracy after stitching each seam.
What does a 1 4 inch sewing foot look like?
A 1/4 inch sewing foot looks like a regular presser foot, but with an adjustable guide attached to it. The guide is used to ensure that the needle is set at ¼ inch from the edge of the fabric when stitching.
What is the best way to sew a quarter-inch seam for quilting?
The best way to sew a quarter-inch seam for quilting is to use a walking foot. A walking foot helps keep the layers even and the seam allowance consistent, which is especially important when quilting. Additionally, make sure to mark your seam lines by drawing a horizontal mark on the fabric closest to the edge of the presser foot
