Do you sew? Are you tired of sewing by hand? Then you should definitely learn how to backstitch on a sewing machine.
Back stitching is a simple technique that allows you to create beautiful stitches on fabric. In fact, it’s used to make most embroidery designs.
If you want to master the art of backstitching, then read on. I’ll teach you how to back stitch on a Singer sewing machine.
Related Topic: How to Restore Singer Sewing Machine Base: An Insider’s Guide
What Is The Difference Between Reverse Stitch And Back Stitch?
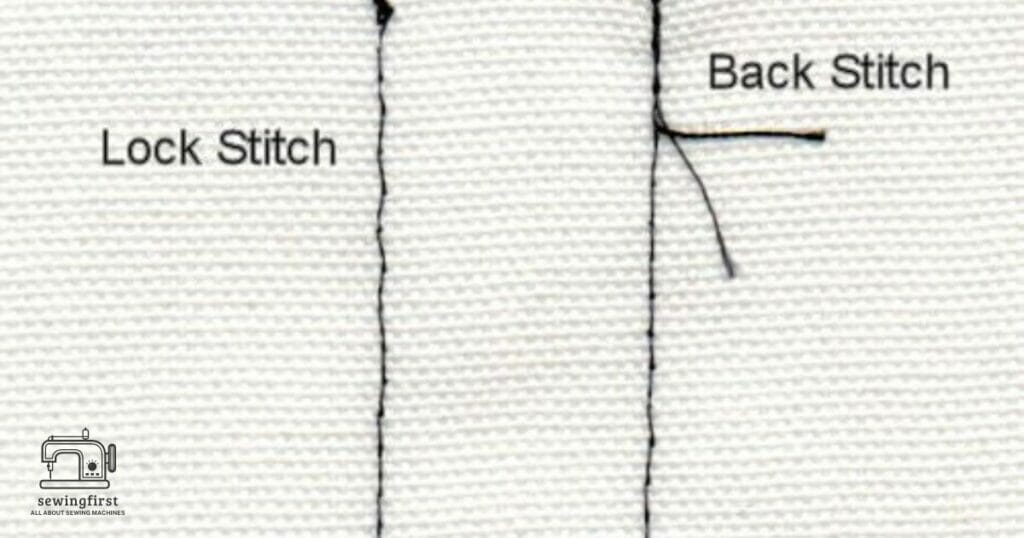
A reverse stitch is also called a backstitch. It is a technique of switching back and forth at the start and end of the seam. This reinforces the stitches and helps prevent fraying. If you want to reverse stitch, you can use a sewing machine button or you can sew by hand.
The difference between a reverse stitch and a backstitch is that the latter goes from one side of the fabric to the other.
In addition, a backstitch has more control over the length of the thread than a reverse stitch.
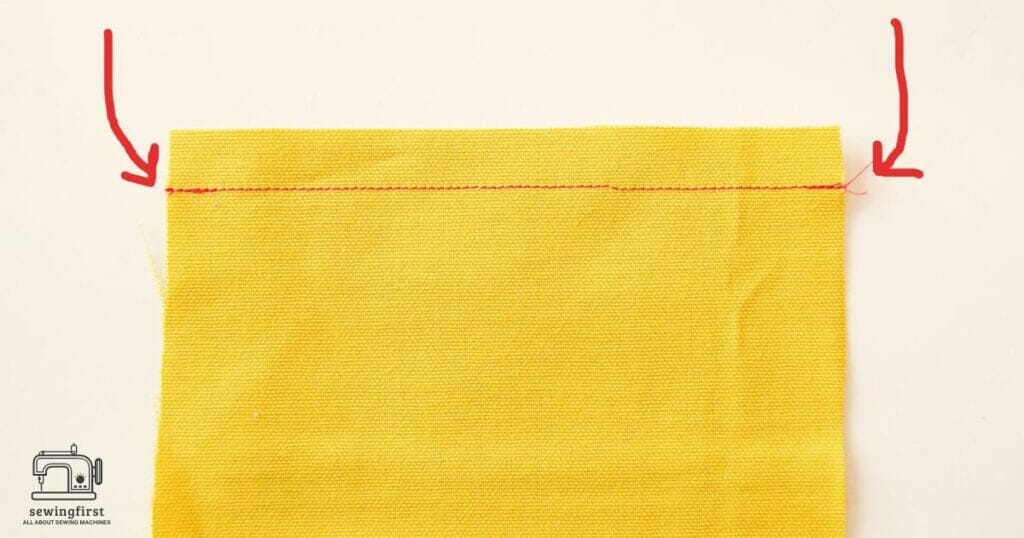
You can use a backstitch to finish off seams, hemming, and cording.
It’s important to note that some sewing machines have a reverse stitch button while others don’t. If yours doesn’t, then you will have to learn how to sew by hand.
How to do Back Stitch on a Sewing Machine? Step By Step Guide
Back stitching is a technique used in quilting that involves sewing the back of your fabric piece together. It’s also called “back-stitching” or “back-sewing”. This type of stitch is often used when you want to make sure that there are no holes left on the back side of your work. You can use this method for any type of project, but it’s especially useful for projects like pillowcases, bags, and clothing. Follow the step-by-step instructions
Step 1 – Prepare Your Fabric
Before you begin, prepare your fabric. Make sure that it’s clean and dry. Also, cut out the pieces of fabric that you want to sew together.
Step 2 – Set Up Your Sewing Machine
Make sure that you set up your sewing machine properly before you start sewing. First, turn off the power switch on the machine. Next, remove the bobbin case and put it aside. Finally, take out all of the needles except the needle that you’re using.
Step 3 – Thread Your Needle
Thread your needle with the appropriate amount of thread. For example, if you’re making a bag, you may want to use cotton thread. However, if you’re making something else, you might prefer polyester thread.
Step 4 – Start Sewing
Now that you’ve prepared your fabric and threaded your needle, it’s time to start sewing. Begin by placing the right sides of the two fabrics together. Next, insert the needle into the first hole on the edge of the fabric.
Step 5 – Pull Through
Once you’ve inserted the needle, pull through the fabric. Then, continue pulling the needle through until you reach the second hole on the edge of your fabric.
Step 6 – Repeat Steps 3 & 4
Repeat steps 3 and 4 until you’ve sewn both edges of your fabric. Once you’ve finished sewing, trim away any excess threads.
Step 7 – Finish Off Your Seams
If you need to reinforce your seams, you can do so by using a zigzag stitch. Simply place the needle down on top of the previous line of stitching. Then, move the needle across the fabric and repeat.
Reverse Or Back Stitch Control
Modern sewing machines have reverse stitch controls. Some even have multiple setting options for changing from forward to reverse stitches.
For example, if you set the control to 1, then you would only go through the fabric once when you are stitching.
However, if you set the setting to 2, then you would go through the fabric twice. This means that you can adjust the amount of time you spend going through the fabric depending on what type of project you’re working on.
This feature comes in handy because sometimes you may not be able to reach all the way around the edge of the fabric.
So instead of having to cut out the excess material, you can just turn the dial down until you get to where you need to be. This function helps sewers secure seams easily.
It also makes it easier to move your needle from one side of the fabric to the other without getting tangled up in threads.
If you don’t use this feature often, you might want to consider turning it off so you don’t accidentally change the setting while sewing. You can do this by pressing the button on the machine’s foot pedal.
There are two ways to activate the reverse stitch control: pressing the button or changing the setting.
Back Stitch On Sewing Machines
Sewing machines come in many shapes and sizes. Some sew fabric, others stitch leather, and still, others stitch paper. But no matter which sewing machine type you use, backstitching is one of its most useful features.
Back stitching is used to attach two pieces of material together. This feature is especially helpful when making bags, purses, and wallets.
To perform back stitching, simply thread the needle through the top piece of material, pull the needle out, and insert the needle through the bottom piece of material. Pull the needle through until the two pieces of material meet. Then tie off the ends of the threads.
This process is simple enough for beginners, but there are some things to keep in mind:
First, make sure you’re using the right kind of sewing machine. Most sewing machines have a built-in backstitching function. However, not every model has this feature. So before buying a sewing machine, find out whether it includes backstitching.
Second, make sure you’re following proper instructions. Many sewing machines include detailed instruction manuals that show you exactly how to operate the machine. Make sure you’ve read these instructions thoroughly before attempting any backstitches.
Third, make sure you’re working on the correct materials. The wrong materials may cause problems during back stitching. For instance, if you try to back stitch on a plastic bag, you may end up tearing the bag instead of attaching it properly.
Finally, make sure you’re paying attention to details. There are several ways to back stitch correctly. One method involves inserting the needle at a 45-degree angle. Another requires you to hold the needle parallel to the edge of the material. Still, another technique uses a zigzag pattern.
Regardless of which method you use, pay close attention to detail. Otherwise, you risk ruining your project.
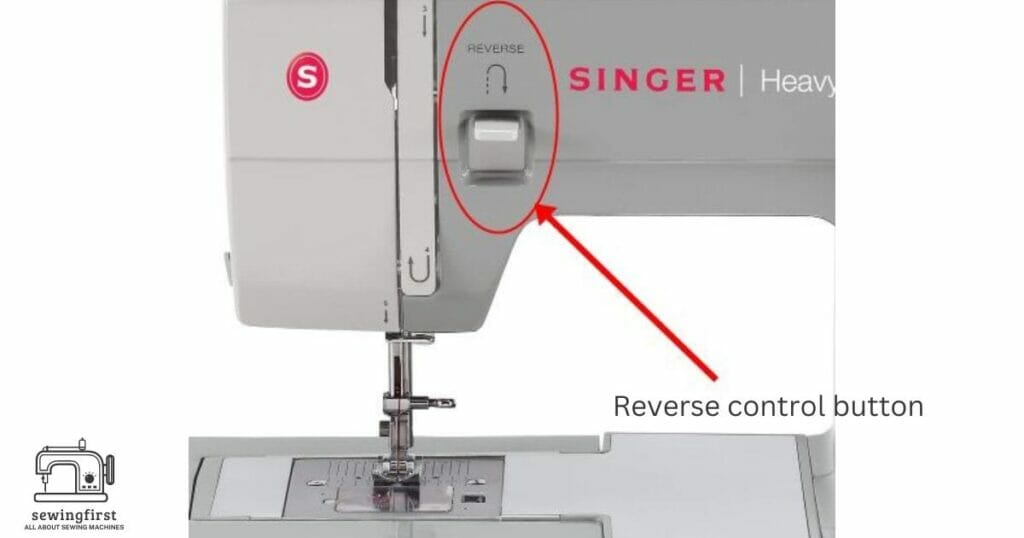
Back Stitch On A Singer Sewing Machine
When using a back stitch on a Singer sewing machine, you’ll want to use the button marked with the U-shaped arrows. This button allows you to sew through both layers of fabric without stitching into the seam allowance.
The first step is to hold the fabric as the sewing machine sewed backward and stopped the machine manually by taking your foot off the pedal. You want to make sure that the needle doesn’t go into the fabric because it could damage the machine.
Next, deactivate the reverse stitch function. To do this, press the button again. Then start sewing. When you’re done, take your foot off the pedal and let the fabric relax.
If you accidentally pressed the wrong button, turn the machine off and turn it back on to reset the settings.
To the right of the machine, there is a reverse button. When stitching, you’ll need to pull out the needle from the fabric using the reverse lever.
Learn How to Back Stitch on a Singer Sewing Machine
Singer Sewing Machine Stuck in Back Stitch
If you’re having trouble getting your sewing machine out of backstitch, try these tips:
- Make sure the needle is not caught in any fabric.
- Pull gently on the thread attached to the bobbin case. This should free the needle.
- Try pulling the bobbin case toward you. The needle may be stuck inside the bobbin case.
- Use a small pair of pliers to pull the needle through the hole in the bobbin case. Be careful not to break the needle off.
- Remove the needle from the bobbin case and rethread it onto the needle.
- Reattach the bobbin case to the sewing machine.
- Start stitching again.
- If this doesn’t work, call a professional sewing machine repair technician.
How To Use A Back-Stitch Button or Reverse Button On Your Sewing Machine
To use a backstitch or reverse button on your sewing machine, first set up the needle position for the desired stitch type.
Next, select the appropriate stitch length and width.
Then press down on the backstitch button.
Once you’ve done all these steps, you’re ready to begin stitching!
Now let’s take a look at how to backstitch using a free-motion foot.
Free Motion Foot For Backstitching
This method works best if you are new to sewing because it requires a lot of practice.
- First, open the throat plate of your sewing machine.
- Next, remove the bobbin case and replace it with the bobbin case cover.
- Finally, place the bobbin case cover on top of the bobbin case.
- When you’re finished, close the throat plate.
- Now, turn on the power switch and adjust the tension until the needle moves smoothly through the fabric.
- Next, lift the presser foot and attach the feed dog.
- Make sure the needle is positioned correctly so that it won’t hit any part of the presser foot.
- Next, lower the presser foot onto the fabric.
- Lift the presser foot again and slowly move the needle forward.
- As soon as the needle touches the fabric, stop moving the presser foot. Now, release the presser foot and pull out the needle.
- Repeat this process until you reach the desired number of stitches.
- Afterward, raise the presser foot and continue sewing.
How To Sew By Hand With A Backstitch
Sewing by hand is an excellent way to learn how to backstitch.
- First, prepare your fabric by cutting it into the correct size.
- Next, fold the fabric in half and pin it together along the edges.
- Place the folded edge under the presser foot and align it with the edge of the fabric.
- The next step is to insert the needle into the fabric.
- Pull the needle through the fabric until it reaches the backside of the fabric.
- Insert the needle into the fabric again and pull it through.
- Continue doing this until you reach the desired distance.
- Afterward, cut the threads and remove the pins.
- If you want to make a straight stitch, simply hold the fabric taut and keep pulling the needle through.
- If you want a curved line, put the fabric on a flat surface and roll it around the needle.
- Continue rolling until you get the desired shape.
Back stitching with a Singer Sewing Machine: 3 Ways
Back stitching is one of those things that most sewers don’t really think about until they run into problems. Back stitching is used to secure loose threads after cutting off a seam allowance.
It’s an essential skill for any sewer, but especially for beginners. If you’re using a manual sewing machine, you may not realize that you need to back stitch.
However, if you’re using a modern electric sewing machine, you probably won’t find instructions for backstitching. That’s okay, though, because you can learn how to back stitch on a sewing machine without ever needing to read a manual.
Using the Automatic Stitch Control Button
This method works on any computerized sewing machine that has an automatic stitch control button. This button allows you to select stitches automatically. However, all industrial sewing machines come with this button.
First, set your needle position to the top left corner of the fabric. Then, press the automatic stitch control button. Next, adjust the length of the stitch according to the desired size of the seam allowance.
Finally, release the automatic stitch control button and let go of the foot pedal. Make sure not to hit the thread plate if you accidentally press the wrong button
Using the Reverse Stitch Function
This method works on basic sewing machines that have reverse stitch functions. To use this method, first set your needle position to the bottom right corner of the fabric.
Press the reverse stitch button. Adjust the length of the stitch to match the desired size of the sewn seam allowance, for example, straight stitches. Release the reverse stitch button and let go of the foot pedal.
Using the Manual Stitch Length Dial
This method works on old and vintage sewing machines that have manual stitch-length dials. First, set your needle position at the center of the fabric. Turn the dial clockwise until the desired length of the stitch is reached.
Release the foot pedal and remove the thread guide.
Now that you know how to back stitch on your sewing machine, practice on scraps of fabric. Once you feel comfortable, try it on a larger piece of fabric.
Remember, backstitching is an essential skill for every sewer. Practice makes perfect!
Backstitch Tips And Tricks
Here are some tips and tricks to help you master the art of backstitching:
- When you start sewing, make sure the needle is inserted from the front side of the fabric.
- Make sure the needle goes through the fabric only once.
- Keep the needle perpendicular to the fabric.
- Pull the needle through the fabric without twisting or turning it.
- Don’t forget to sew over the thread tails when you finish each row.
- If you have trouble getting started, try holding the fabric taut while inserting the needle.
- You can also use a special tool called a backstitch ruler to help guide you during the backstitch.
- If you find yourself struggling with the backstitch, try practicing on scrap fabric before starting a project.
- Use different types of fabrics for different projects.
- Try using different types of needles for different materials.
- Practice makes perfect!
Conclusion
In conclusion, when using a sewing machine, it is always recommended to backstitch first. This way, you don’t accidentally sew through the fabric. It is also recommended to use a thread color that matches the fabric and read the user manual.
In addition, it is recommended to use a needle size that is appropriate for the material being sewn. And lastly, it is recommended to set the tension correctly. All of these factors combined will ensure that your stitching looks professional and neat.