
Are you struggling to get the perfect stitch on your Brother sewing machine? Do you find yourself constantly adjusting the tension but still not getting the desired result? Well, fear not! In this article, we will show you how to adjust the tension on a Brother sewing machine like a pro.
To adjust the tension on your Brother sewing machine, you first need to understand what it is and how it works. The tension regulates the amount of thread that is pulled through the fabric. If the tension is too loose, the stitches will be too loose and if it’s too tight, the stitches will be too tight. We will guide you through the process of adjusting the tension to get the perfect stitch every time.
As someone who loves to sew, I’ve experienced my fair share of tension issues on my Brother sewing machine. But with a bit of practice and patience, I’ve learned how to adjust the tension and avoid those frustrating sewing mishaps. Whether you’re a beginner or a seasoned pro, we’re here to help you troubleshoot and improve your sewing skills. Let’s get started!
Related Topic: How To Oil a Sewing Machine Brother: Expert Secrets Revealed
Tools Needed For Adjustment
Tools are needed for adjusting the tension on a Brother sewing machine. You’ll need your tension dial, pressure foot, tension knob, tension pin, and two tension plates. The tension dial is located at the front of the machine and it’s used to adjust the upper thread’s tensile strength. The pressure foot helps keep your fabric layers together while you sew.
The small plastic knob above it adjusts needle penetration depth into the fabric and can affect thread tensions as well. Lastly, there are two metal pieces inside the machine called ‘tension plates’, which help regulate the amount of thread being pulled through each stitch.
These tools will ensure that you get a consistent stitch length when making adjustments to your machine’s tension settings. With these items in hand, you’re ready to dive further into understanding how the tension system works on a sewing machine.
Understanding The Tension System Of A Sewing Machine
Did you know that there are approximately 200 sewing machine parts located within a modern household sewing machine? Among these, one of the most important is the tension system. With this in mind, let’s look at how to adjust the tension on a Brother Sewing Machine.
The tension device is responsible for maintaining proper thread tension when sewing and will influence stitch quality. It consists of two discs that control the upper and lower thread tensions separately.
The tension settings can be adjusted by turning each disc clockwise or counterclockwise depending on what issue needs to be corrected; if too much thread is being pulled up from below, turn it counterclockwise, otherwise turn it clockwise. Doing so helps to ensure even stitching throughout your project.
In order to make sure that your desired tension setting is achieved properly, test your thread tension with sample fabric scrap before beginning any major projects. Once tested, continue making adjustments until you achieve a satisfactory result. By following these steps you’ll have no problem adjusting the tension discs on your Brother Sewing Machine!
Location Of Tension Knobs On Brother Sewing Machines
Brother sewing machines have two tension knobs, one for the upper thread and another for the bobbin thread. On most models, these can be found on the front of the machine near where the threads meet. The upper thread tension knob is typically labeled with a number that ranges from 0 to 9. This dial controls how tight or lose the top thread will be while stitching.
The bobbin tension knob is usually marked with “L” (for left) and “R” (for right). This knob determines how tightly wound your bobbin should be when it’s being pulled up through your fabric by the presser foot. It’s important to adjust this correctly so that you don’t end up with too much or too little tension in either your upper or lower threads.
To get started, take a look at both knobs and make sure they are set to their default positions before beginning any type of sewing project. Once you understand their basic functions, you’ll be able to easily adjust them as needed depending on what kind of stitch you’re trying to achieve.
As you become more comfortable using your Brother sewing machine, feel free to experiment with different settings until you find what works best for each individual project! With practice comes mastery – soon enough, adjusting these tensions will become second nature.
How To Adjust Upper Thread Tension
Adjusting the upper thread tension of your Brother sewing machine can be a daunting task, but with the right guidance and know-how, it is doable. Let’s start this journey to mastering this skill!
3 Steps To Adjust Upper Thread Tension:
Check for normal thread tension: Begin by threading the upper part of your sewing machine following the instructions in its manual. Once done, check if the stitches are even on both sides of the fabric; if not, then you need to adjust the tension settings.
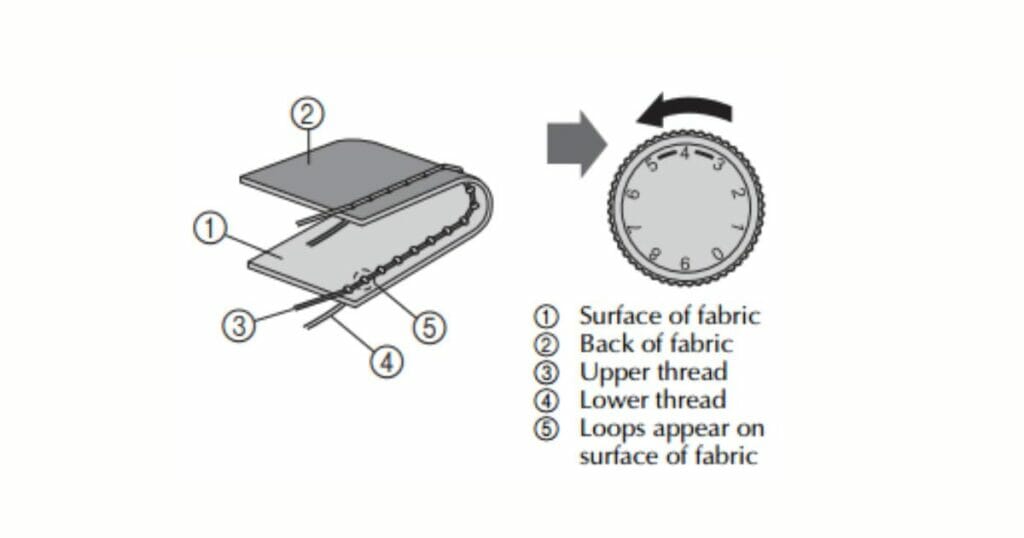
Locate metal discs: The next step is to locate two metal discs present above or below the needle plate that controls the amount of pressure put onto the thread. These discs will have numbers ranging from 0 to 9 denoting different levels of tension settings available.
Change setting as desired: Now turn these discs until you reach the ideal tension level depending upon the thickness of the material being used and the kind of stitch required (e.g., straight/zigzag). Try out a few samples before finalizing settings so that threads won’t break while stitching and there will be an even flow along the entire fabric surface.
By adjusting upper thread tension correctly one can achieve professional-looking results every time they sew with their Brother sewing machine! So now let’s move on to learning how to adjust lower bobbin tension – another important aspect here!
How To Adjust Lower Bobbin Tension
The next step in adjusting the tension on your Brother sewing machine is to adjust the lower bobbin tension. To do this, you will need to locate the bobbin case tension screw located at the bottom of your machine near where you thread your bobbins.
Turn this screw counterclockwise until it stops, and then turn it clockwise one-quarter of a turn – this should provide the default tension for most projects.
Next, take out the bobbin and pull out some of the threads so that they hang freely from the bobbin case. Now hold onto the loose thread with one hand while turning the knob on top of your bobbin case with your other hand – continue until these threads are neither too tight nor too loose when pulled from behind. If done correctly, there should be just enough resistance as you tug gently on them.
If needed, make any necessary adjustments by turning in either direction depending on whether or not more tension is required or if it needs to be loosened up a bit. Once everything looks good, replace your bobbin and check for proper tensions before moving on to another project!
Checking For Proper Tensions
It’s essential to check for the correct thread tension when using your Brother sewing machine. Not only will it ensure that you get professional-looking results, but it can also prevent any potential damage to your fabric or machine. You must be aware of the proper tension settings and how to adjust them on the sewing machine itself.
Thread guides and tension disks are two important components in making sure you have the right amount of thread tension. Thread guides help keep the thread from getting tangled in other parts of the machine by providing a straight path for it to go through.
Tension discs are used to regulate how tight or lose the threads should be pulled when stitching. They’re adjusted by turning the dials located near where the threads enter into the machine’s body.
Knowing what kind of fabric you’re working with is key too; different fabrics require different levels of tension depending on their weight, texture, stretchiness, etc. Once you’ve set up your Brother sewing machine correctly with these components and know what type of material you’ll be using, then adjusting its tension dials becomes much simpler and easier!
Troubleshooting Tips And Techniques
Troubleshooting tips and techniques for adjusting the tension on a Brother sewing machine are essential to ensure that your stitches come out looking great. If you’re experiencing incorrect thread tension, it’s likely because of an issue with the upper tension control dial or auto tension settings.
First check to make sure that the needle is correctly seated in its slot, as this can throw off your stitch tension if not done properly.
Then locate the upper tension control dial—this should be set at a default of around 4-5 depending on your machine model. Increase or decrease this setting until you find the right balance between having too much slack and too tight of stitches.
If these steps don’t fix the problem, then consider using auto-tension mode instead. This feature allows your machine to automatically adjust when switching between different fabrics and threads, which can help eliminate any guesswork involved with manual adjustments. Once again, experiment with different settings until you get the desired results.
No matter how advanced your machine may be, there will always be times when some trial and error is needed to achieve optimal stitching performance from it. Keep taking notes of what works best for each type of material and save them for future reference – soon enough, you’ll have perfected the art of fine-tuning! Moving forward, we’ll explore strategies for keeping your machine in working order long term.
Keeping Your Machine In Working Order
Now that you know the basics of troubleshooting tension issues on your Brother sewing machine, it’s time to focus on keeping proper tension settings over time. To do this, there are several steps you can take and some things to keep in mind:
- Make sure you’re using the correct needle for your fabric type; a dull needle will affect tension more than anything else.
- Check limited availability parts such as feed dogs and presser feet to make sure they are in good working order and aren’t causing any friction on the fabric or thread.
- Adjust the normal tension setting according to manufacturer instructions – be careful not to overtighten!
- Keep an eye out for imbalances that may develop over time due to wear and tear from use; if necessary, readjust the balanced tension accordingly.
It is important to practice regular maintenance on your Brother sewing machine so that it continues running smoothly and at its best performance level. You should also check all components periodically for signs of damage or wear and replace them as needed with genuine replacement parts.
Taking these simple yet essential steps will help ensure that your machine remains in great condition and operates reliably day after day.
Maintaining Proper Tension Settings Over Time
Once you’ve achieved the correct tension settings on your Brother sewing machine, it’s important to keep them that way. Automatic tension settings can vary from time to time, so it’s essential to check for any changes in thread tension every now and then.
To do this, test a sample of fabric by stitching it with the same type of thread used in the project. If the stitches look too loose or tight compared to what they should be, make small adjustments until you get back to the default tension setting.
When needed, make sure to adjust both upper and lower tensions simultaneously as these two settings need to remain balanced. During regular use, pay attention if there are any signs of skipped stitches or looping underneath the fabric – this could indicate incorrect tension values which will affect stitch quality and strength.
It is possible for automatic tension settings to gradually drift away from their original value over time due to wear and tear inside the machine. It’s best practice to routinely reset all settings back to their defaults once a year – this helps ensure consistent results when using your Brother sewing machine!
And with that said…it’s time we move on to cleaning and lubricating our machines for optimal performance.
Cleaning And Lubricating The Sewing Machine
Adjusting the tension on a Brother sewing machine is an important part of its maintenance and can help to prevent common issues with stitching. When done correctly, it ensures that your stitches will be properly balanced and lay flat.
To adjust the tension, you’ll need to locate the front-loading bobbin in your sewing machine’s shuttle race. This is usually found directly underneath the needle plate.
Once you have located the bobbin, check for any knots or tangles. It’s also important to make sure that there isn’t too much thread around the bobbin area as this could interfere with proper tension adjustment.
Once everything looks clear and free from obstructions, you’ll need to manually adjust the actual tension setting by turning clockwise until you feel some resistance; then turn it counterclockwise until you achieve desired stitch quality. Be sure not to over-tighten since this could cause damage to the fabric being sewn.
Finally, keep in mind that different fabrics require different levels of tension so if necessary, further adjustments might be needed in order to get optimal results. With regular cleaning and lubrication of your Brother sewing machine as well as careful attention paid to its tension settings, you should be able to enjoy many years of smooth operation without any problems!
As we move on to replacing worn parts or components, remember that minor repairs are often easier than major ones – but both take time and effort.
Replacing Worn Parts Or Components
Did you know that the average sewing machine has more than 600 moving parts? With so many components, it’s no wonder why a Brother Sewing Machine can experience problems with tension.
Loose tension can cause fabric puckering while higher tensions may result in broken threads or skipped stitches. As such, it is important to understand how to adjust the tension on your Brother Sewing Machine:
- Adjust the tension dial: This is one of the easiest ways to adjust thread tension on any model of Brother Sewing Machine. The setting should be between 2-4 for normal thread tension; however, if you are working with fabrics like silk and satin, then raise the settings slightly higher.
- Check actual tension: To make sure the settings are correct, use a special tool known as a Fabric Tension Meter to check the actual tension being applied by your sewing machine needle. If necessary, adjust accordingly until desired results are achieved.
- Replace worn parts or components: Over time, it’s possible for certain parts and components within your Brother Sewing Machine to wear out due to regular usage. In this case, it’s best to replace them immediately rather than attempt an adjustment yourself without proper training or expertise.
By following these tips and taking care of your Brother Sewing Machine properly, you will ensure optimal performance from your device over time – even when replacing worn parts or components becomes necessary!
Professional Repair Services
Adjusting the tension on a Brother sewing machine can be tricky. It’s important to have actual tension, balanced tension, and basic thread tension in order for it to work properly. The difficulty of this task may leave you feeling frustrated with seemingly endless adjustments.
If your attempts are unsuccessful, don’t panic – there are professional repair services that specialize in helping with such issues.
Qualified technicians will assess each individual situation before making any necessary repairs or providing advice. They’ll make sure all components are working correctly and provide helpful tips on adjusting embroidery tension settings to ensure the smooth functioning of the machine.
Furthermore, they’re equipped with knowledge about certain models and brands so they know exactly what needs to be done if something goes wrong.
Professional repair service providers guarantee satisfaction by ensuring any job is done right the first time around, saving you from potential frustration down the line.
So if you find yourself unable to adjust your Brother sewing machine’s tension settings, contact a technician for help – it’s worth the investment! Before moving on to safety precautions when making adjustments, consider looking into professional repair services as an option for getting your machine up and running again quickly and efficiently.
Safety Precautions When Making Adjustments
Adjusting the tension on a Brother sewing machine is an important part of maintaining its proper functioning. To prevent injury or damage to your machine, it’s essential to take certain safety precautions when making adjustments to the tension settings. Here are four key tips:
- Test out different tensions on a scrap piece of fabric before working with your actual project material. Different types and weights of fabrics require different levels of tension for optimal results.
- Avoid over-tightening the upper thread so much that it causes strain on either the needle or bobbin case. Doing so could lead to serious problems like skipped stitches or broken needles.
- Make sure all parts are correctly aligned before adjusting any tension settings. If something isn’t seated properly, you may accidentally cause more harm than good by tightening too much or incorrectly placing components back in place after adjustment.
- Be patient throughout the process – rushing can result in mistakes and potential damage to both your machine and the materials being used. Take time to ensure everything is secured as needed before beginning work again.
When making adjustments to your sewing machine’s tension settings, always remember these key tips for staying safe and preventing unnecessary repair costs or further issues down the line!
Conclusion
Concluding my article on how to adjust the tension on a Brother sewing machine, I want to emphasize the importance of safety when making adjustments. It’s important that you take all necessary precautions and consider professional repair services if you feel uncertain of your own abilities.
The process can seem intimidating at first, but with patience, practice, and dedication, you’ll be able to master it in no time!
Just imagine yourself as a skilled seamstress or tailor who knows exactly what they’re doing – turning knobs and dials until everything is perfectly adjusted. Visualizing this will help guide you through each step of adjusting the tension system of your Brother sewing machine.
With these tips in mind, I’m confident you can now adjust the tension settings on your Brother sewing machine without any trouble!
FAQs
What tension should my Brother sewing machine be set at?
The tension settings on a Brother sewing machine may vary depending on the model and type of fabric that you are working with. Refer to the user manual for your particular model to determine the correct tension setting.
How do you adjust the bobbin tension on a Brother sewing machine?
The bobbin tension on a Brother sewing machine should be adjusted by turning the bobbin tension dial. This dial is located on the side or back of the machine, depending on the model. The tension should be adjusted until the thread is drawn up evenly between the fabric and the bobbin case.
Why are my stitches loose on my Brother sewing machine?
There are several reasons why your stitches may be loose on your Brother sewing machine. Possible causes include the following: incorrect thread tension, incorrect stitch length setting, incorrect needle size, incorrect needle type, incorrect presser foot pressure, worn or damaged needles, and incorrect threading. You may need to experiment with the settings to determine the cause of the issue.
How do I know the correct tension for my sewing machine?
Most sewing machines come with a manual that will include instructions on how to adjust the tension. Alternatively, you can check the manufacturer’s website or contact them directly for specific instructions for your machine.
What should the settings be on my Brother sewing machine?
The settings on your Brother sewing machine will depend on the model you have. It is best to refer to the instruction manual provided with your machine for exact settings. Generally, you will need to adjust the stitch length, stitch width, tension, and presser foot pressure to get the desired result.
What number should bobbin tension be?
Bobbin tension should typically be set between 4 and 6 on the tension dial of your sewing machine.
How do you tighten bobbin thread tension?
To tighten bobbin thread tension, turn the tension dial on your sewing machine clockwise. Make sure to test the tension by sewing a few stitches and checking the back of the fabric for any loose or tight stitches. If the tension is still not correct, adjust the dial again until the stitches are even.
What are the two tension adjustments on the sewing machine?
The two tension adjustments on a sewing machine are the upper thread tension and the bobbin thread tension. The upper thread tension controls the amount of pressure placed on the thread coming from the spool and going through the machine, while the bobbin thread tension determines how much tension is placed on the thread coming from the bobbin and going through the machine.
What tension is needed for thick fabric?
The tension needed for thick fabric will depend on the type of fabric and the intended use. Generally, a higher tension is needed for thick fabrics so that the stitches are securely held in place. When using a sewing machine, it is recommended to use a needle size of 90/14 or larger, along with a tension setting of 4-5.
What tension should I use for thin fabric?
For thin fabric, you should typically use a tension setting of 2-4 on your sewing machine.
