
Are you looking to take on a new creative challenge? If so, learning how to sew leather with a sewing machine is the perfect project for you. Sewing can be an incredibly rewarding and liberating experience that allows us to express our creativity in unique ways. Whether it’s making your own leather bag or patching up a favorite piece of clothing, there are endless possibilities when it comes to working with this versatile fabric.
In this article, I’ll show you everything you need to know about how to sew leather using a standard household sewing machine – no special equipment is needed!
From selecting the right type of thread and needles to mastering the proper technique, I’m here to guide you through each step of the process. By taking the time to learn these essential skills now, you will have all the knowledge necessary to make beautiful and durable pieces from leather in no time.
So get ready; we’re about to dive into an exciting world of crafting! With some patience and practice, soon enough you’ll be able to create amazing items out of one of humankind’s oldest materials – Leather!
Related Topic: How to Sew Burlap with a Sewing Machine: Techniques Simplified!
What You Need
Are you feeling inspired to work with leather? Sewing leather is an art form in itself, and can feel intimidating for a beginner. But don’t let that stop you from diving into this creative craft! With the right supplies, like a special needle, nylon thread, presser foot, walking foot, and of course some pieces of leather – sewing leather isn’t so hard after all. Let’s get started on what you need to do before taking your machine for a spin on those supple hides.
Preparing The Leather For Sewing
Before proceeding with the sewing process, it’s important to prepare your leather material first. The best way of doing this is by using a sharp and durable leather sewing needle. Make sure you puncture a permanent hole in the leather before stitching.
This will help keep the thread from slipping or breaking during the project. Additionally, you should use heavy-duty thread for thicker leather materials. Thicker threads are strong enough to handle heavier fabrics like leather and can withstand more tension when pulled through the fabric. If your thread is too thin, it might snap under strain which could damage your piece and force you to start from scratch.
After selecting the right type of needle and thread for your project, take some time to adjust their sizes as well. Ensure that both lengths match each other so that they won’t get tangled up while being used inside your machine later on. When everything looks good, you’re now ready to move on to setting up your machine!
Setting Up Your Machine
Now that you’ve decided to sew leather with your sewing machine, it’s time to get set up. Before diving in and starting the project, make sure that you have an industrial sewing machine or a heavy-duty machine capable of handling thicker fabrics like leather. If not, consider purchasing one before continuing.
Next, thread both the top and bobbin threads just as you normally would for any other fabric. It is important to use polyester thread when working with leather because it is much stronger than regular cotton thread. Then attach a roller foot onto the machine; this will help keep everything flat and smooth as you are stitching through multiple layers of leather.
Once all these steps are completed, turn on the machine and do some practice stitches on scrap pieces of material until you feel comfortable enough to move forward with the real thing! This is a great way to ensure that all settings are correct and that no mistakes will be made during production.
Tips For Successful Sewing
Sewing leather with a sewing machine is not an easy task. It requires patience and skill to get it right. To make the process easier, here are some tips for successful sewing.
- First of all, you should use cotton thread when sewing leather pieces together because it will give your project more strength and durability than other types of thread.
- You should also make sure that the tension on your industrial machine is set correctly as this will help ensure that each stitch looks even and neat.
- Additionally, if possible, do some test runs before starting so you can adjust the settings accordingly.
- Finally, be patient and take your time while stitching the leather pieces together. This will enable you to create a clean-looking product that won’t come undone easily.
With patience and practice comes success! Transitioning into the subsequent section about different stitches to try out, there are plenty of options available depending on what look or effect you want to achieve.
Different Stitches To Use
Now that you have the basics of sewing leather down, let’s move on to different stitches and techniques. For most leather projects, a manual or standard sewing machine is usually preferred over an electronic one because it can more easily handle heavy-weight materials like leather.
The type of thread used for stitching should be strong enough to hold two pieces of leather together without breaking or tearing. A good rule of thumb is to use polyester thread for heavier weights and cotton thread for lighter-weight fabrics.
One popular technique for joining two pieces of leather together is waxed linen threading, which involves using a special kind of waxed linen thread along with an awl (or large needle) to make holes in both pieces of leather.
This method produces tight and durable stitches that will last longer than traditional hand-stitching methods.
Another common technique used by professional leather workers is saddle stitching, which requires two needles that are inserted into the same hole and then pulled through simultaneously in opposite directions. Saddle stitching creates a stronger seam than regular hand stitching due to its interlocking nature.
Regardless of the stitch being used, there are several tips that all aspiring leather workers should keep in mind when working on any project: Always use sharp tools; never force the material while cutting or punching holes; always measure twice before making cuts; and remember to test out your stitches before committing them permanently! With these simple tips, anyone can successfully complete their own unique piece of leatherwork!
Joining Two Pieces Of Leather Together
Sewing leather is a magical experience like no other. With just the right combination of supplies, threads and patience, you’ll be able to join two pieces of leather together with ease! Here’s what you need: * Thread tension set appropriately for your type of leather * Regular needle * Binder clips or pins
To begin sewing your leather seams, start by threading the machine with strong nylon or polyester thread that can hold up against the weight of the material. It helps to use a needle size appropriate for heavier fabrics such as denim needles.
Adjust the thread tension to match the thickness of your particular piece of leather – if it’s too tight, there won’t be enough room in between stitches; if it’s too loose, then the stitching may come off easily later on.
Pin both pieces of fabric firmly together before beginning to sew them together – binder clips are particularly useful here since they don’t leave any holes behind after removal.
As you’re ready to go now, align one edge so that it’s even and steady before carefully guiding it through the needle plate. Sew slowly and evenly while adjusting pressure accordingly until all raw edges are securely joined together.
Take regular breaks from sewing and check how much progress has been made each time – this ensures accuracy and prevents mistakes along the way. After all, seams have been completed properly, cut away excess thread tails without damaging either layer underneath.
Double stitched seams will give an extra level of durability but make sure not to overdo this process as too many layers can create bulk at certain areas.
Finally, admire your workmanship and enjoy knowing that every stitch was sewn by hand with care! From here we move on to creating decorative hems and patterns using our trusty machines – let’s dive into that next!
Creating Seams And Hems
Creating seams and hems on leather is a challenge, but with the right techniques, it can be done. To start, I recommend using sewing clips to hold two pieces of leather together for easier stitching. If you don’t have these clips handy, the double-sided tape does an admirable job as well. Now that the two pieces are held together securely, it’s time to get set up at your machine!
Make sure your feed dogs are lowered before beginning any leather project. This will help keep them from catching on to the leather hide and pulling it through too quickly or unevenly.
Start off by testing out different stitch types until you find one that works best for your project; some machines work better than others when stitching leather.
Once you have found a suitable stitch type and tension setting, begin slowly guiding the fabric under the needle while slightly pressing down on both sides of the seam line with your hands. Doing this ensures even feeding of the material into the footer and great results in terms of finished look and durability.
With all these steps followed properly, you should now have beautiful seams ready to complete whatever project you’re working on! Let’s move on to finishing those edges…
Finishing Edges
Finishing edges is an important step in any sewing with the leather project. You’ll want to make sure your hems are neat and secure, so it’s worth taking the time to learn how to do this correctly. When you’re working with thinner leather or projects that require a lot of detail, the straight stitch can be used for seams and hems.
To ensure a nice finish on your garment, start by folding the hem over twice before stitching. This will help prevent fraying when worn or washed. Make sure the stitches are small and even – using a contrasting thread color will also look great!
For more support around curved areas use multiple rows of topstitching which will give extra strength as well as help to keep the shape of your garment intact. It may take some practice but once you’ve mastered it you’ll have professional-looking results every time!
Next up we’ll look at attaching zippers and buttons – two key components of most leather garments.
Attaching Zippers And Buttons
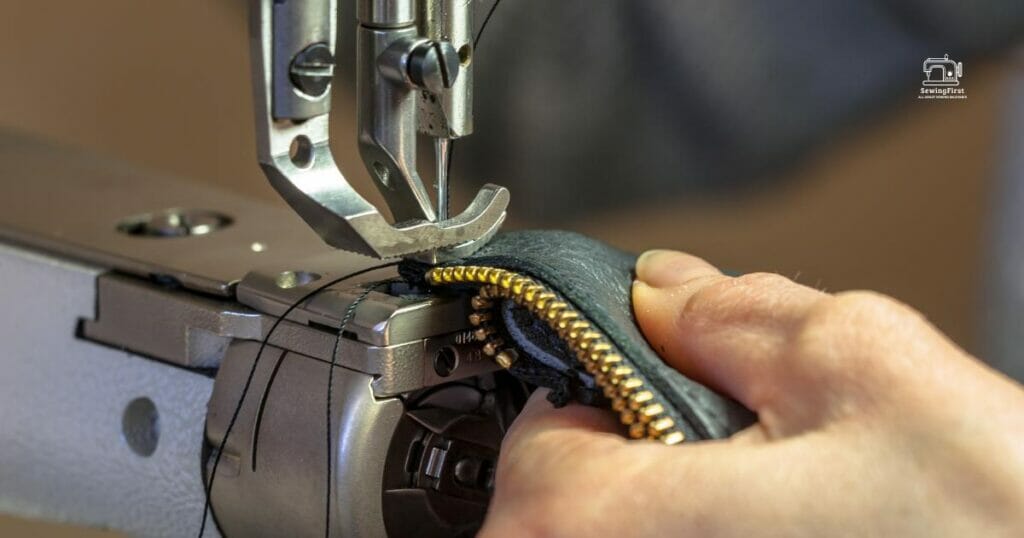
Once you’ve mastered sewing leather with a sewing machine, it’s time to move on to attaching zippers and buttons. With faux leather, vegan leather, or any other type of material you’re using for your project, the process is pretty straightforward.
The first step is to mark where you want the zipper or button to go on the fabric. Then use a leather working tool such as an awl to make holes in both sides of the seam so that the needle can penetrate through easily.
Make sure that when piercing the hole, don’t pierce all the way through; just enough so that there are two small indentions on either side of the seam.
Next, attach one side of the zipper or button to one side of your fabric by pushing each end into its corresponding hole. If needed, place some scotch tape over this area to hold it in place while you sew it together.
Afterward, thread up your machine with heavy-duty thread and stitch along each edge until they are securely attached together. This will ensure a nice tight seal around these areas so that nothing falls off during wear and tear!
When finished, check if all pieces stay secure after several tests before moving on to sewing patches and appliques!
Sewing On Patches And Appliques
Who knew that sewing on patches and appliques could be so easy? It all starts with having the right equipment. For example, you’ll need a variety of sizes and types of leather to create layers if necessary. Then there’s the crucial step of selecting the appropriate presser foot for your sewing machine. This will give you the best control when stitching fabric or leather together.
Next, it’s time for creativity! You can find plenty of designs online or use your imagination to come up with something unique. When I make my own patches, I like to add an extra layer of felt behind them to make sure they don’t rip easily over time. It also adds a nice finished look once they are sewn onto whatever project you’re making.
Last but not least is assembly! Line up your patch or applique where you’d like it and start stitching away using a straight stitch. Depending on how thick your layers are, this may take longer than expected – but just keep going until it’s securely in place!
With patience and practice, you’ll soon have perfect-looking patches every time. Now that we’ve covered the basics of how to sew leather with a sewing machine, let’s move forward to repairing leather fabric…
Repairing Leather Fabric
Leather fabric can be repaired in a few simple steps. First, you will need some pattern pieces of the leather and scrap leather to patch up any holes or tears that may have occurred over time.
Next, set up your domestic sewing machine with the strong thread for stitching through multiple layers of leather. It’s best to use paper clips instead of pins when attaching the two pieces together so that no permanent damage is done to the cloth surface.
Be sure to make small stitches at first on a test piece until you get used to how thick the material is. Then, gradually increase stitch length as needed for larger repairs.
Once everything is sewn together properly, turn it inside out and inspect your work before finishing off with an edge binding if desired. If not done properly, this could cause further tearing down the line so take extra care during this step!
Lastly, iron any seams flat using parchment paper between them and your presser foot – this prevents melting or sticking which would ruin your hard work.
With these tips, repairing leather fabric doesn’t have to be difficult and can even add character back into an item that has seen better days! Now we’ll look at making pockets in leather garments without having to sew them by hand.
Making Pockets In Leather Garments
Sewing leather is like writing a poem – you need the right tools, materials, and techniques to achieve perfect results. As with any garment creation project, it’s essential that you understand how to make pockets in your leather pieces:
- Begin by marking out the pocket pattern on the wrong side of your fabric.
- Make sure to use tailor’s chalk or disappearing ink markers so as not to leave permanent markings on the material.
- Use a ruler and pins to mark lines where you will be stitching.
It’s important to take extra care when sewing around curves; using an even stitch length helps keep the tension even and consistent for better results.
Start at one corner of your pocket opening and work slowly around until completely finished before cutting away excess material from seams. Once done, press lightly with an iron if needed to ensure all parts are lying flat against each other.
Now that you know how to create pockets in your leather garments, next up is cleaning and maintaining the machine you’re using – something just as crucial as making sure each stitch looks great!
Cleaning And Maintaining The Machine
After each time you sew leather, it’s important to take care of your machine. Cleaning and maintaining the sewing machine is key for a successful project.
First, make sure to unplug the machine before cleaning its exterior or interior parts. Next, use a soft cloth dampened with lukewarm water to clean off any dust particles that may have accumulated over time on the body of the machine.
Then, using a small brush attachment, vacuum away excess fabric chunks from inside the bobbin case and underneath the feed dogs where they meet the throat plate. This will help prevent these fabrics from impacting future projects.
Finally, oil all moving parts as directed in your user manual. Doing this helps ensure that your machine runs smoothly every time you work with leather!
Troubleshooting Common Issues With Sewing Leather
Sewing leather can be tricky and it’s easy to come across issues. But luckily, there are some simple solutions that you can use to troubleshoot these problems. The first issue may be when your sewing machine won’t feed the leather evenly or at all.
This is usually caused by using a needle size too small for the thickness of the leather. To fix this, switch out your needle for one with a larger gauge and try again.
Another common problem is stitching that isn’t strong enough. Leather needs more tension than normal fabric in order to hold stitches securely so make sure you adjust yours accordingly.
Additionally, if you find yourself breaking needles often while working on thicker pieces of leather, then opt for a stronger type such as an industrial-grade or denim needle instead.
Finally, don’t forget about lubricating your machine frequently. Sewing machines need regular maintenance just like any other tool and applying oil correctly will help keep them running smoothly – especially when dealing with thick materials like leather!
And with these tips in mind, you should have no trouble mastering the art of sewing perfect seams each time. Now let’s move on to advanced techniques…
Advanced Techniques
Once you’ve mastered the basics of sewing leather with a machine, it’s time to move on to more advanced techniques. Believe it or not, mastering these methods can make your work look even better! As luck would have it, there are several ways that you can add depth and texture to your projects when working with leather.
The first technique is called blind stitching. This involves making small holes in the leather before inserting the needle. To do this, use an awl to create tiny punctures along where you want the stitch line to go. Then, simply insert the needle through each hole and pull it tight – no need for backstitching! Another method is top-stitching which adds a decorative element as well as strength.
All you have to do is set up two rows of stitches parallel to one another using thicker thread than usual. Finally, embossing is also an option if you want to give your leather project some extra flair.
You’ll need special tools like stamps or molds depending on the design but once they’re ready just press them into the material firmly until they leave their mark behind!
With these techniques at hand, creating beautiful pieces of leatherwork has never been easier! From adding intricate details to giving your items added durability – these methods will help take your creations from good-looking to great-looking in no time flat. So get out there and start exploring all the possibilities offered by working with leather today!
Conclusion
In conclusion, sewing leather with a sewing machine is a great way to create beautiful and durable garments. With the right tools and techniques, it’s easy to learn how to do this craft successfully.
It’s estimated that 1 in 5 people worldwide owns a sewing machine, so why not try your hand at creating something unique out of leather? Plus, you know that whatever you make will last for years!
Once you’ve mastered some basic techniques like setting up your machine and stitching different types of stitches, you can delve into more advanced methods such as making pockets or other features in more complex pieces of clothing.
Sewing leather is a fun challenge that anyone can take on with confidence. With practice, patience, and a few helpful tips along the way, soon enough you’ll be able to proudly show off your creations made from leather!
FAQs
What type of sewing machine do I need to sew leather?
You will need a heavy-duty sewing machine with a larger-than-average needle size, and a stronger-than-average motor. A leather needle should also be used. Look for a sewing machine specifically designed for sewing leather and other heavy fabrics, such as a walking foot machine.
What stitches for leather?
Leather stitching is typically done with a saddle stitch. This is a two-needle technique that uses a single thread and creates strong, durable stitches that won’t unravel even if one of the stitches breaks. It is a simple but time-consuming process that requires two needles, two spools of waxed thread, and an awl or leather punch.
How do you sew leather at home?
Sewing leather at home can be done with a sewing machine. You will need to use a heavy-duty needle, leather thread, and a leather needle plate on your machine. It is also important to use a walking foot on your machine to help feed the leather through evenly.
Additionally, use a thimble to protect your finger from the needle. Make sure to also use a heavy-duty thread and stitch length, as leather is thicker than regular fabric.
