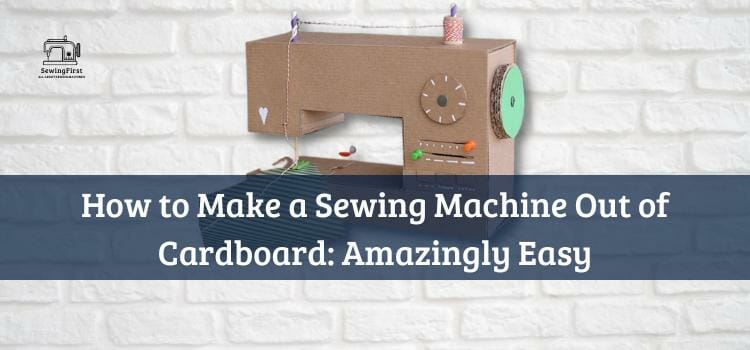
Creating something from nothing can be both challenging and rewarding. Crafting a sewing machine out of a cardboard box may seem like an impossible task, but with the right materials and know-how, it can easily become a reality!
From experienced crafters to complete beginners, anyone can make their own sewing machine out of a cardboard box in no time at all. Imagine crafting your own clothes or making custom gifts for friends – the possibilities are endless once you learn how to build your very own sewing machine. Read on to discover just how to make a sewing machine out of cardboard!
So let’s dive into what you’ll need for this project and explore some simple techniques for putting everything together. You’re about to embark on an exciting journey as you turn ordinary items into something extraordinary – a homemade sewing machine built entirely out of cardboard!
Related Topic: How to Make a Sewing Machine Extension Table: Be the Pro You Wanted To Be
Gather Materials Needed
Getting started on your cardboard sewing machine project is an exciting endeavor! Gathering the materials you need to make it will set you up for success.
A few items that are essential when making a sewing machine out of cardboard include
- Scissors
- Tape
- Glue
- Markers (or paint)and a ruler or measuring device of some kind.
- Pieces of fabric
- Paper items like string, yarn, buttons, or other decorations.
It’s important to think outside the box when you gather supplies for this project. Consider what type of cardboard works best- thick or thin? Is there any way to reinforce it with extra layers so that it will be more durable?
You can even add color by decorating with markers or painting directly onto the cardboard if desired. Whatever features you choose to add should serve a purpose in helping create a functional sewing machine.
To ensure that all these pieces come together properly and last over time, take accurate measurements as you design your model. Measure twice before cutting once; this adage applies here too!
Designing The Sewing Machine
Designing the sewing machine is a crucial step in creating this innovative project. After gathering all of the necessary materials, it’s time to begin planning and constructing the actual cardboard model.
- This process can be broken down into four simple steps that will help bring your sewing machine design to life!
- First, draw a blueprint of what you’d like the end result to look like. Think about how everything should fit together – from the base to the thread spool holder.
- Taking some measurements beforehand helps make sure that each piece fits together perfectly when it comes time for assembly.
- Next, create templates for each individual part of your device. Make sure that these are cut out with precision so they match up accurately once assembled later on.
- Don’t forget to include any holes or slots needed for wiring and hardware installation! Here are just a few things that you’ll need patterns for:
- Base plate
- Bobbin case
- Thread guide/spool holder
- Motor housing
Now it’s time to start bringing your vision to life! Take one template at a time and trace them onto cardboard pieces according to their size and shape specifications. Carefully cut out each piece and set it aside until ready for assembly.
As you go along, don’t forget those extra details such as buttons or other decorative features — these really add something special to the overall design!
Time to put all of these parts together! With patience and skillful craftsmanship, construct your very own custom sewing machine made entirely from cardboard– an impressive feat indeed!
Cutting The Cardboard For The Sewing Machine
The first step in building your own cardboard sewing machine is to cut the necessary pieces from corrugated cardstock or heavy-duty cardboard.
Depending on the size desired, use scissors, utility knives, die cutters, or other cutting machines to achieve accurate measurements and symmetrical shapes that will assemble properly.
Choose colors that best match the surrounding décor in your workspace as well as any additional embellishments like ribbons and buttons.
Once all parts are cut out according to plan, it’s time to move on to assembling them into a working stationary device.
Assembling The Parts For The Sewing Machine
Now that you’ve cut out all the pieces of cardboard, it’s time to assemble them into a functioning sewing machine. Put together your motor and gears, making sure they fit snugly so they don’t move around while in use. Be careful as you connect the parts – nothing should be too tight or too loose!
Next, attach the needle holder and bobbin case to the frame. This is where most of the stitching happens, so make sure these components are firmly connected.
Once everything appears secure, check each piece again with a magnifying glass to ensure there aren’t any weak spots that could break during usage.
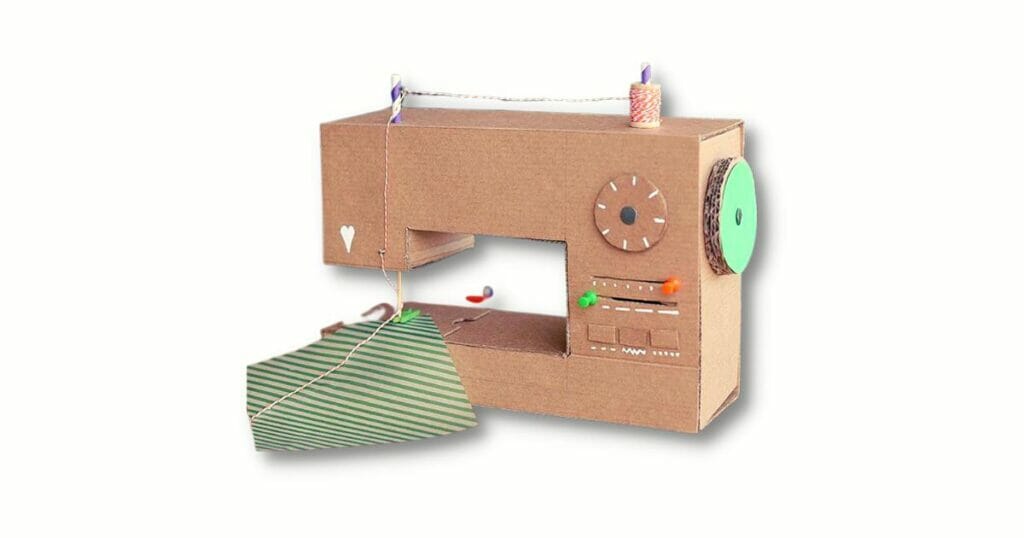
With all the moving parts now attached, your makeshift sewing machine is almost complete! The next step is adding decorative elements like fabric or paint to really bring this project home.
Get creative and have fun as you customize your very own mini-sewing machine – perfect for mending small tears or stitching up projects at home!
Adding Decorative Elements To The Sewing Machine
Now that the sewing machine is nearly complete, it’s time to bring this cardboard creation to life with some decorative elements.
This part of the project can be as creative and imaginative as you like! You could use craft supplies such as sequins, glitter, or paint to make your cardboard sewing machine look unique and eye-catching.
If you’re feeling daring, why not try making a 3D model of the actual parts of a real sewing machine? Paper cutouts or clay figures will give your design an extra edge of realism.
Adding details like these is really what makes a project stand out from the crowd – so don’t hold back! Be sure to take advantage of every opportunity for personal expression here. It’ll be fun to see how many characters you can add to something made entirely out of cardboard.
Tips For Creating A Durable Sewing Machine
Creating a durable sewing machine out of cardboard may sound impossible, but with the right materials and technique, it’s totally doable! With some patience and creativity, you can make an impressive replica that will last for years.
- Start by gathering the necessary supplies: thick cardboard or foam board, scissors or box cutters, glue sticks, decorative paper such as contact paper or wrapping paper, markers, or paints to color your design. It’s also helpful to have a ruler on hand to measure and line up pieces properly. Once you have all these items together, it’s time to get started!
- Start assembling the basic shape of your sewing machine using cardboard. To ensure durability and sturdiness in your structure, use extra layers of cardstock when needed.
- Cut each piece out accurately – this is key to having a successful build! When you’re done cutting everything out, begin gluing parts together one at a time while pressing firmly into place until secure. Make sure there are no gaps between large pieces so they don’t come apart easily later on.
- Add any decorative elements that take your fancy – from colorful designs made with marker pens and paintbrushes to intricate details like buttons and fabric trims.
When finished building your masterpiece you’ll be left with a unique creation that resembles a real-life sewing machine! And thanks to its sturdy construction it should stand up against wear and tear over time making this project well worth the effort.
Projects That Can Be Completed With A Cardboard Sewing Machine
Ready to explore the possibilities of a cardboard sewing machine? With some ingenuity and creativity, you can make all kinds of projects with this homemade tool. From garments to accessories, let your imagination run wild!
For starters, why not try making a simple shirt or skirt out of cotton fabric and thread? Use one side of the cardboard for cutting and tracing your pattern pieces, then use the other side as an ironing board.
To assemble each piece together, simply pin them in place before using your makeshift sewing machine to stitch everything up. Add buttons or zippers if desired — it’s completely up to you how intricate you want things to be!
Plus, don’t forget about creating fun decorative items too. You can add colorful patches on clothing for unique designs, create quilted pillows, and even embroider patterns on bags.
Unleash those inner DIY skills by experimenting with different materials such as felt or soft foam. There are endless possibilities when it comes to crafting something special with a cardboard sewing machine!
Troubleshooting Common Problems With A Cardboard Sewing Machine
Making a sewing machine out of cardboard is an innovative and creative way to start a new project. However, it does present some unique challenges that must be addressed in order for the best results. In this section, we’ll discuss common problems when working with a cardboard sewing machine and how to troubleshoot them.
Use Metal Needle
The first issue you may encounter is getting the needle thread through the eye. This can be tricky as cardboard tends to be stiffer than traditional fabrics used in regular machines.
To make sure your thread goes through easily, try using a metal needle instead of plastic or waxed cotton thread instead of polyester yarn. If those techniques don’t work, use tweezers or even dental floss to carefully guide the thread into place without causing any damage to the material.
Cutting Fabric Too Close
Another potential problem involves cutting fabric too close to edges and seams. When dealing with small pieces of fabric like pockets and hems, always cut away from the seam line so there’s no risk of fraying or shredding when stitching together.
Avoid Stretching Materials
Additionally, you should avoid stretching materials while cutting; stretchy fabrics can cause incorrect measurements if not handled properly! With these tips in mind, you’ll have an easier time making precise cuts for whatever project you’re working on with your homemade sewing machine.
By understanding what issues could arise during construction and having solutions at hand before starting a project, crafting with cardboard becomes much simpler – unlocking countless possibilities for creativity!
Safety Precautions When Working On A Cardboard Sewing Machine
Working with a cardboard sewing machine can be an exhilarating experience for any innovator. However, it is important to remember to always stay safe when tinkering around with such contraptions.
To ensure the best and safest outcome from your project, there are certain safety precautions you should take while working on a cardboard sewing machine.
- Make sure that all sharp objects associated with your project (scissors, knives, etc.) are kept far away from children and pets. If they get their hands on these tools, they could easily cause harm or even damage the project itself!
- Keep in mind that cardboard isn’t as strong as other materials like metal or plastic – so handle it carefully. It’s also wise to wear protective gear such as goggles and gloves if possible.
- When soldering wires together, never use more than 30 watts of electricity at a time; this will prevent electrocution or fire hazards. Make sure no exposed wires remain after securing them into place. Lastly, don’t forget to unplug the power source whenever you’re finished using it!
These steps may seem tedious but they provide invaluable protection against accidents or injury during the construction or operation of your cardboard sewing machine.
Conclusion
In making a sewing machine out of cardboard, the creative possibilities are endless. With the right tools and materials, you can build an efficient machine that looks great and performs just as well as any other commercial-grade equipment. By following safety precautions while building your own device, you can be sure to create something that is safe and reliable in its operation.
FAQs
How to make a sewing machine out of cardboard?
Gather all necessary supplies before beginning construction; this includes a cutting board, scissors, utility knife, glue gun, ruler or tape measurer, paper clips, rubber bands, and fabric scraps.
Start by assembling the frame of the machine using layers of cardstock reinforced with duct tape where appropriate. Make sure to leave enough space between each layer so air can circulate freely when the motor is running.
Install the motor into place securely with screws or nuts and bolts depending on what type of material it’s made from. Connect wiring according to manufacturer specifications for best performance results.
Finally, attach fabrics onto the armature with hot glue or binder clips for easy removal if needed later down the line.
Can I sew through cardboard?
Yes, you can sew through the cardboard with the right tools. Make sure to use a sharp needle and strong thread that won’t break easily. You may also need to use a thimble or other protective gear to protect your hands from the sharp edges of the cardboard.
What can I sew for beginners without a sewing machine?
For beginners, some easy projects to start with include making a pillowcase, a drawstring bag, or even a simple skirt. All of these projects require basic sewing skills and can be done without the use of a machine. If you have access to one, however, it will make the process much easier and faster.
What is the hardest material to sew?
Leather is generally considered to be the hardest material to sew. It is thick and tough, making it difficult to work with. Specialized needles and heavy-duty thread are usually needed when sewing leather. Additionally, it’s important to use a thimble or other protective gear when working with this material as it can be sharp and abrasive on the hands.
Can you embroider through cardboard?
Yes, you can embroider through the cardboard with the right tools. Make sure to use a sharp needle and strong thread that won’t break easily. You may also need to use a thimble or other protective gear to protect your hands from the sharp edges of the cardboard.
How does mini sewing machine work?
Mini sewing machines work similarly to regular-sized machines but on a much smaller scale. They use a motor to power the needle thread, and the user controls the speed and direction of the stitch with a foot pedal or switch. The fabric is held in place by clamps or pins, and the machine can be used for basic repairs or decorative stitching.