Do you feel like your sewing machine is hemmed in, restricted by its own limitations? Are the current boundaries of your workspace holding back your creative potential? With a few simple tools and materials, you can break free from those confines and expand into new realms with a homemade Sewing Machine Extension Table.
This helpful guide will provide step-by-step instructions on how to make an extension table that’ll give your trusty machine room to breathe, enabling it to explore new heights of productivity and creativity. We’ll cover everything from what supplies are needed for the job, to troubleshooting tips if anything goes wrong along the way. So let’s get started!
Sewing without limits – it starts here. Unlock hidden possibilities with this guide as we show you exactly how to make a Sewing Machine Extension Table. Ready… set… sew!
Related Topic: How to Make a Sewing Machine Out of Cardboard: Amazingly Easy
What is a Sewing Machine Extension Table and Why is it Important?
When it comes to completing a sewing project, having the right tools and equipment can make all the difference.
Take for example my aunt’s quilt-making hobby – she had a heavy-duty sewing machine that could handle thick fabrics with ease, but its limited table space meant her projects were often cramped or incomplete.
That’s why she decided to build a sewing machine extension table: an extra workspace that expanded her area of operation, giving her more room to work on bigger projects.
A sewing machine extension table is essentially a rectangular platform made from sturdy material like wood or metal which attaches to your existing sewing machine. It serves as an additional flat surface so you can spread out fabric without crowding the original tabletop.
This makes it easier to maneuver bulky items such as duvets, curtains, and large garments while allowing you to keep your hands free when measuring and cutting material.
Moreover, these tables are designed to be durable enough to hold heavier objects than the average tabletop – making them ideal for those who sew frequently with heavy-duty materials.
Having this extra support opens up new possibilities – not only in terms of size but also design complexity since larger pieces give more freedom when positioning patterns.
Thus, investing in a quality sewing machine extension table is key if one wishes to take their craftsmanship further and create better results faster!
What Materials And Tools Do You Need To Make A Sewing Machine Extension Table?
Making a sewing machine extension table requires the right materials and tools. The items you need to have on hand are important for making sure that your project is successful, so let’s go over what those key items are.
- Heavy-duty metal frame: This will be used as the main structure of your extension table, so it needs to be sturdy enough to support the weight of both the fabric and the machine itself.
- Wood screws: They will help attach all of the other parts together securely.
- Seam ripper handy: this will help with any mistakes along the way!
With these three items in hand, you’re ready to start building your sewing machine extension table! Now we can move on to measuring and cutting out all of our necessary parts – no step needed.
How To Measure And Cut The Parts For Your Sewing Machine Extension Table
When making a sewing machine extension table, it’s important to measure and cut the parts carefully. The dimensions of your project will depend on the size and shape of your sewing machine.
You’ll need a material with a smooth surface that is sturdy enough for free-motion sewing, as well as feed teeth or cleats to secure the fabric while you sew.
Begin by measuring out both sides and the back of your table frame, then mark each part on the wood with a pencil. Once all of your pieces are marked, use a saw to cut them along the lines you’ve drawn.
It’s best if you make several passes with a handsaw instead of trying to take too much off in one go – this will help ensure accuracy when assembling later on.
You should also make sure that all edges are even after cutting; use sandpaper or an electric sander if necessary to achieve perfectly straight cuts. By following these steps, you’ll have all of the right-sized parts needed to assemble your new sewing machine extension table!
How To Assemble The Moving Glide Parts
Assembling the moving glide parts for your DIY sewing machine extension table is an essential step in ensuring a smooth and efficient operation.
You’ll need to make sure that you have all of the necessary components before beginning, including adjustable presser foot pressure, as this will ensure your heavy-duty projects are properly handled. Once everything is ready it’s time to get started!
- First, use screws to secure the upper slide rail into place on the mounting plate. Make sure these screws are firmly tightened so that there is no movement when using the extension table.
- Attach two flathead screws onto each side of the lower slide rails and then fit them over the upper slide rails from earlier. Then carefully move both sides outwards until they reach their maximum range.
- Finally, add washers and lock nuts to keep things in place.
Now you’re almost finished with creating your very own sewing machine extension table! All that’s left now is installing the legs which will provide additional support while also allowing you to adjust its height as needed.
With a careful assembly of all of these parts, your new creation should be good to go in no time at all! Let’s move on to getting those legs attached and finishing up our project.
Installing The Legs For Your Sewing Machine Extension Table
Installing legs for your new sewing machine extension table is an important step in giving yourself plenty of extra space and making sure all parts are secure.
When attaching the legs, make sure to check that all screws are tightened properly before moving forward. The additional support from the legs will be necessary when using heavier attachments such as a buttonhole foot or bobbin thread holder.
Assemble them with care so that everything remains stable even after many hours spent in your sewing space. Now it’s time to move on to final adjustments and preparations for your sewing machine extension table!
Be sure to take measurements of your existing workspace so you can choose the right height and size for the extension table. This ensures that you’ll have enough room while create beautiful pieces without feeling cramped or overwhelmed by too much clutter.
Final Adjustments And Preparations For Your Sewing Machine Extension Table
Once you have installed the legs for your sewing machine extension table, it is time to make the final adjustments.
- Make sure all connections are secure and tight before plugging in the power cord.
- Check that any thread supply mechanisms are connected correctly and that any one-step buttonhole functions work properly.
- Ensure that there is enough clearance between the paper pattern and foot pedal to prevent them from getting caught on each other when using the machine.
- Before starting up the machine, take a few moments to check its operation. Test out various stitches and settings so you can be confident everything works as intended.
- If something does not seem right or if you notice an issue, double-check your connections or contact customer service for further assistance.
Now, with all of these preparations complete, you should be ready to start using your new sewing machine extension table! All that’s left now is to get familiar with how it operates so you can begin creating beautiful creations with confidence.
Large Sewing Extension Table – An Overview
A large sewing extension table is an ideal choice for those looking to take their sewing projects to the next level. It can accommodate standard sewing machine motors, making quilting and general sewings easier than ever before. With a paper pattern in place, you’ll be able to create larger pieces with greater accuracy too.
The design of the large sewing extension table allows easy installation onto most models of machines, providing additional stability and convenience when working on larger projects.
You’ll also find that it helps keep your fabric in place while stitching or pressing, as well as giving you plenty of room to spread out fabrics or other materials as you work. Plus, its solid construction ensures durability and longevity so that it’s sure to stand up against wear and tear over time.
No matter what type of project you have planned, this large extension table will provide ample space for all your needs without taking up too much floor space in your home studio or workspace. Overall, it makes the perfect addition for any serious sewer who wants more flexibility and control over their creations!
What Accessories are Included with the Large Sewing Extension
When purchasing a large sewing extension table, it’s important to know what accessories are included. These can range from items that help with the overall structure and stability of the table to those that aid in crafting specific sewing techniques.
The basics will likely include screws and other mounting hardware for fastening the table together as well as rounded corners to ensure safety while using the machine. Additionally, some tables may come with additional items such as
Extra parts: This could include spare pieces like extra screws or brackets should any break during assembly or usage.
Tools: A variety of tools such as Allen wrenches, chisels, clamps, and sandpaper might also be included depending on the model of your new purchase.
Accessories: For more intricate work, you’ll want to make sure there is an ample selection of bobbins, threaders, needles, and other supplies necessary for completing a project in one place.
These few components are essential for the successful use and implementation of a large sewing extension table no matter your level of expertise; having them readily available ensures that all projects run smoothly without hindrance due to a lack of materials or tools. Now let’s consider the various purchasing options and add-ons for these machines.
Purchasing Options And Add-Ons For Large Sewing Extension Table
When shopping for a large sewing extension table, there are many options and accessories to consider. Most of the time, you’ll receive bolts and screws with your purchase that allow proper assembly of the product.
Additionally, some tables come pre-assembled right out of the box so you can skip this step entirely. It’s also worth looking into any add-ons or extras available as they can be quite helpful when completing projects involving paper patterns or more intricate designs.
For instance, if you’re an experienced sewer then it might be beneficial to look into buying a light attachment that allows for better visibility while working on detailed pieces.
With better lighting comes increased accuracy in your stitching which could make all the difference between a successful project and one riddled with mistakes. Similarly, extra thread spindles may prove useful – especially if you find yourself changing colors often during projects.
The main idea here is to figure out what will help improve your workflow without breaking the bank. If certain features aren’t necessary then avoiding them altogether can help keep costs down significantly.
On the other hand, having access to high-quality tools makes all the difference in achieving professional results every single time – so don’t skimp out where it really counts!
From there we can move on to our next section about getting familiarized with Sew Steady Large Deluxe 18″ x 24″ Sewing Machine Extension Table – an overview so you know exactly what kind of experience awaits.
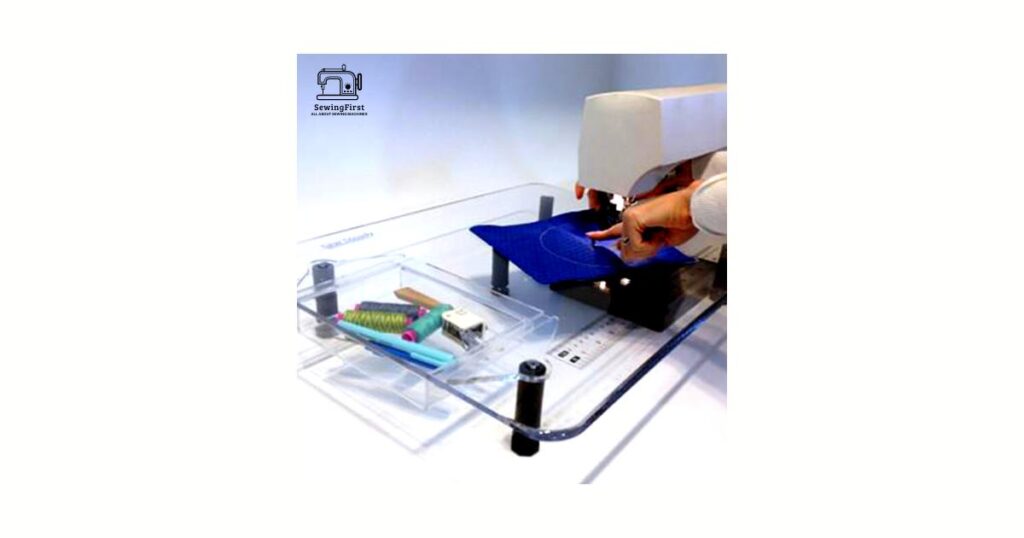
Sew Steady Large Deluxe 18” X 24” Sewing Machine Extension Table – An Overview
If you’re looking for a larger sewing extension table, then the Sew Steady Large Deluxe 18” x 24” might be just what you need. Take Sarah, who was looking to upgrade from her small folding utility table – this large deluxe model offered plenty of extra space and features that she needed for quilting projects. Here are some of its key features:
- Easy-to-assemble design with no tools required.
- A low-vibration surface that won’t move when in use.
- Made from lightweight yet durable acrylic material.
- Fits machines up to 17 1/2″ wide by 10 7/8″ deep.
- Includes 2 removable inserts to fit your machine’s base dimensions perfectly.
The Sew Steady Large Deluxe is an excellent choice if you want more room while working on bigger projects. It also helps keep your workspace organized as it comes with several handy storage compartments around the sides.
The low-vibration surface ensures smooth operation even at high speeds, making it perfect for heavy-duty jobs such as customizing clothing or creating intricate designs. Plus, the easy-to-assembly design means you can set it up quickly and start using it right away!
Finally, one of the best things about this large deluxe model is its affordability – at under $ 150 USD, it offers great value compared to similar models which may cost more than double.
With all these features combined, this makes it an ideal option for those seeking more space without breaking the bank. Moving forward, we’ll look at ways to create a DIY sewing machine extension table and consider tips for getting the most out of your new setup.
DIY Sewing Machine Extension Table – Considerations And Tips
In the world of craftsmanship, much can be achieved with a few tools and some creative ingenuity. Just as an artist wields brushes to create a masterpiece, so too does any good crafter rely on their sewing machine for perfect stitching.
But even these most reliable devices need help sometimes – enter the sewing machine extension table! As helpful as it is versatile, this tool can extend the capabilities of your machine in ways you never thought possible. Here are some considerations when making your own DIY version.
When crafting your own sew-steady large deluxe 18” x 24” extension table, there are several factors to consider first. The size should match that of your current sewing machine setup; if not, it won’t be doing its job properly!
Additionally, take into account how stable and durable the materials used should be – after all, this is an item meant to last you through many projects over time.
Finally, make sure you have enough room around the edges for both fabric and thread storage while working; otherwise, clutter will slow down progress or get in the way entirely.
One way to ensure success when building a homemade option is by finding plans online beforehand. This allows one to familiarize themselves with what goes where before actually starting construction.
Plus, following step-by-step instructions saves time overall and makes troubleshooting much easier than ‘winging it’ would do. That said though, don’t forget about safety precautions either – always wear protective gear like goggles and gloves when handling power tools during assembly!
With thoughtful planning and due diligence put forth into creating your very own sewing machine extension table, you’ll soon find yourself ready to tackle bigger projects without hesitation or worry.
From quilting larger fabrics to taking on more complex stitching techniques – whatever comes next in your crafting journey awaits thanks to this multifaceted device!
Sewing Machine Extension Tables And Their Benefits
Are sewing machine extension tables really worth the effort? The answer is a resounding yes! Not only do they provide extra space for larger projects, but also come with numerous additional benefits. Let’s take a closer look at why you should consider investing in one of these tables.
- Having an extended table surface makes it easier to work on bigger items without strain or discomfort.
- You can spread out your project materials and bring them up close to you so that there’s no need to constantly lean over while working.
- This helps reduce strain on your back and arms, allowing you to sew more comfortably for longer periods of time.
- Many of these tables are adjustable which allows you to set the height according to what suits you best.
- Another great advantage that comes with using an extension table is improved stability when stitching.
- Having a large flat surface means that fabric won’t bunch up or shift during sewing as much as it would otherwise – this reduces skipped stitches and unnecessary re-dos due to messiness or unevenness in fabrics.
- Some models even have built-in rulers and cutting lines marked on their surfaces, making it easy for quilters and seamstresses alike to measure accurately before starting any project!
Sewing machine extension tables offer both comfort and convenience for all types of sewing needs – from crafting intricate garments to piecing together patchwork quilts – so don’t miss out on the opportunity to make every session stress-free and enjoyable!
Conclusion
In conclusion, sewing machine extension tables are a great way to make your workspace more efficient and enjoyable. With the right materials and tools – not to mention creative ideas for add-ons – you can create an extension table that will make all of your projects easier and more fun.
Not only do these tables provide extra room for larger fabrics or multiple layers of fabric, they also offer convenience in terms of storage and portability. Whether you’re looking to purchase one pre-made or build your own DIY version, there is something out there that fits both your budget and needs.
Overall, investing in a good quality sewing machine extension table is always worth it for those who love to sew. It adds comfort, space, stability – even sophistication – making every project just a little bit better
FAQs
Why use a sewing machine extension table?
A sewing machine extension table is a great way to make your workspace more efficient and enjoyable. It provides extra space for larger fabrics or multiple layers of fabric, as well as convenience in terms of storage and portability.
How do you put a sewing machine on a table?
To put a sewing machine on a table, you will need to make sure the table is sturdy and level. You can then attach the machine to the table using screws or bolts, depending on the type of machine you have. Make sure to follow the instructions provided by your sewing machine manufacturer for proper installation.
What are the different types of extendable tables?
The different types of extendable tables include folding tables, adjustable-height tables, and wall-mounted tables. Folding tables are great for portability and can be easily stored when not in use. Adjustable height tables allow you to customize the table to your own needs, while wall-mounted tables provide a more permanent solution.
Do you need a special table for a sewing machine?
No, you do not need a special table for a sewing machine. However, having an extension table can make your workspace more efficient and enjoyable. Extension tables provide extra space for larger fabrics or multiple layers of fabric, as well as convenience in terms of storage and portability.