
Are you looking for an easy and fun way to create something unique? Something that’s all yours, with the power to customize it however you want? Look no further than making a rope basket without a sewing machine! With just basic materials, anyone can make their own stylish storage solution.
You don’t need any special skills or expertise – just some patience and dedication. Let us show you how to tap into your inner DIY-er and craft one of these beautiful baskets from scratch.
This guide will walk you through every step of the process, from gathering supplies to creating intricate designs. Whether you want a simple basket for storing keepsakes or an eye-catching one to add character to your living space, this project is perfect for both beginners and experienced crafters alike.
And when it comes down to it, who doesn’t love feeling powerful by taking on a challenge and seeing it completed?
So grab your tools, get ready to unleash your creativity, and let’s learn how to make a rope basket without a sewing machine!
Related Topic: How to Sew Burlap with a Sewing Machine: Techniques Simplified!
Overview Of The Process
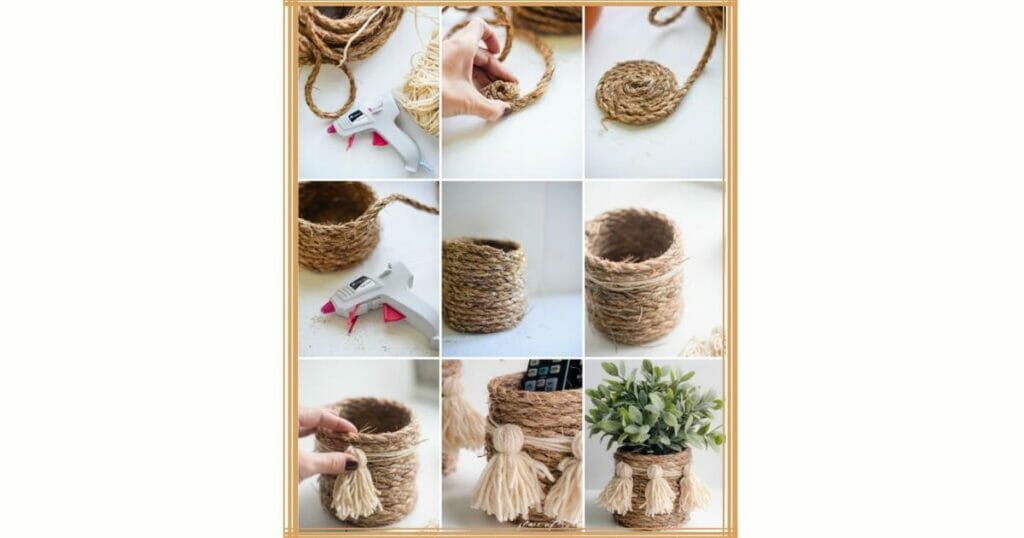
Is it possible to make a beautiful, no-sew rope basket without the use of a sewing machine? Yes! Crafting such a stunning piece is surprisingly simple and requires just a few basic supplies. With some cotton rope and hot glue, you can easily create your own unique coil of rope that will become an eye-catching addition to any room in your home.
The process begins with selecting the right type of rope for your project. Cotton rope is ideal for this purpose because it’s strong yet flexible enough to be formed into different shapes. You will also need some hot glue – preferably one that works well on fabrics like cotton – as well as scissors and something round (like an empty jar) to help shape the basket while you work.
Once you have all the necessary supplies, making a charming no-sew rope bowl is actually quite straightforward. As long as you take care when coiling the rope around itself and using hot glue properly, you should find yourself admiring your handiwork in no time at all!
Necessary Supplies
To begin crafting your rope basket, gather up some basic supplies. You’ll need a hot glue gun, scissors, and either a metal pail or an empty jar to help shape the finished product as you work. Additionally, you will want to select the type of rope that works best for this project; clothesline rope (made from cotton) is ideal due to its strength and flexibility but polyester ropes can also be used if desired.
Now that you have all the materials you need, it’s time to start assembling them into something beautiful! Here are three helpful items to keep in mind while working on this project:
- Always use caution when handling hot glue guns around fabrics like cotton – they can cause burns if not handled properly.
- Make sure the ends of each coil are securely glued together so that your basket stays intact over time.
- Don’t worry too much about creating perfect coils – imperfections can add character and charm to your piece!
With just these few simple tips in mind, you’re ready to start transforming those supplies into a stunning no-sew rope bowl. All that’s left now is forming the spiral coil which we’ll cover next!
Creating The Spiral Coil
Creating the perfect coiled rope basket can seem like a daunting task, but with patience and practice, it is an achievable goal. Visualize yourself holding coils of rope in your hands, transforming them into something unique and beautiful – this is the power that lies within you!
With just a few simple steps, you will be able to craft your own fabric scrap rope bowl without needing any sewing skills.
To create the spiral coil for your basket, start by cutting several feet of rope (or however much fits around the circumference of your chosen jar or pail). Make sure each length is cut to the same size as they need to fit snugly together when glued.
Now begin winding your lengths of rope tightly around the container until they form a continuous spiral pattern – make sure that each subsequent layer overlaps slightly so that everything holds together firmly. As you work, apply hot glue liberally along each line where two pieces join at their ends to ensure stability and longevity for your project.
Once all layers are complete, give it some time for drying before flipping over the can and continuing to glue its bottom side shut.
Flipping The Can And Continuing To Glue
Once your spiral coil is firmly glued and dried, it’s time to flip the can over. This will give you access to the bottom of the basket so that you can add a few more layers of rope for extra strength and stability. As you work on gluing the remaining pieces together, make sure to apply an even layer of glue in order to prevent any loose or frayed edges from becoming visible.
It’s best to use a type of rope that does not fray easily such as a cotton piping cord or jute twine – this way your finished product won’t look sloppy but rather professional.
For those who are just starting out with rope basketry, consider investing in a kit that comes complete with all the necessary materials including lengths of pre-cut rope, hot glue, and handles if desired.
These kits can be found online or at craft stores; having everything included makes it easier for beginners to get started right away without having to purchase additional items separately. The instructions provided should guide you through every step until your project is complete.
With patience and practice, soon enough you’ll have created a unique piece of art with your own hands! Now let’s move on to adding handles so we can transport our beautiful creation with ease.
Attaching Handles
The finishing touch to any handmade rope bowl is the addition of handles. Handles give us the power and freedom to pick up our creations with ease, so they can be admired or used around the home as we, please.
Whether you’re making a large impressive bowl or a smaller basket size, attaching cotton clothesline in tight coils will provide secure handles that won’t ever come loose.
Start by cutting two pieces of cloth line each measuring about twice your desired handle length. Then create a coil at one end of each piece and glue it together like you did when creating the spiral disk for your base – make sure it’s glued firmly before continuing on!
It’s also important to leave just enough space between both ends of your rope disk so that once you attach them onto either side of your bowl, there’s no chance for items stored inside to fall out.
Finally, apply a generous amount of hot glue along the edges where your handle attaches and press it firmly into place for maximum strength – this will ensure a sturdy hold even when filled with heavy items!
Your beautiful handmade creation is now ready to use and display – congratulations!
What You’ll Need For A No-Sew Rope Bowl
Creating a beautiful rope bowl without the need for a sewing machine is possible with just a few simple supplies. The best part? You can make your own unique design in no time at all! All you need to do is gather up some mm macramé rope, fabric strip, and leather punch (or scissors), and you’ll be ready to get started on this fun project.
To begin, tie two adjacent ropes together tightly around an object such as a chair leg or table edge – making sure that both ends of the knot are equal in length. This will form your coiled rope base which should be tight enough that it won’t slip off when filled with items later on.
Once secure, start wrapping one end of the fabric strip over each coil until you reach the other side – try not to leave any gaps between them so they stay snugly attached while filling the basket. Lastly, use either a leather punch or scissors to create holes along each coil – these will become threaded areas where you can attach handles once finished!
Steps To Making A No-Sew Rope Bowl
Now that you have the base of your no-sew rope bowl ready, it’s time to start adding some structure. To do this:
- Use a bobbin thread to stitch in additional rope lengths at regular intervals around the circumference of your bowl.
- Aim for 1/2 inch spacing and make sure each new length is about two inches in diameter.
- Adjust or add extra ropes if needed, keeping in mind that any additional cost may be necessary depending on the desired size of your finished product.
- Once all the stitching is done, begin weaving over and under each adjacent coil to fill in all gaps evenly.
- Avoid pulling too tightly, as this could cause damage or breakage down the line.
- Measure out 2 inches-wide strips along the bottom edge of your bowl using scissors or a leather punch – these will become handles once everything is complete!
Determining Sizing Of The Bowl
When it comes to creating a beautiful rope coil basket, sizing is everything. You don’t want your bowl to be too small or too large–it needs to fit the items you plan on filling it with! To determine the size of your no-sew rope bowl, start by measuring out fat quarters from a fabric strip and then adding an extra inch for seam allowance.
Once that’s done, cut enough pieces so that when laid together they form a circle at least two inches larger than what you need. This will give you room to make adjustments should the finished product not turn out as planned.
For those looking for something more challenging, there are intermediate-level kits available that come with pre-cut fabrics in different sizes and shapes that can help create a stunning end result without all the guesswork!
With this sizing figured out, now it’s time to get started forming the sides of your bowl and making sure each part fits perfectly into place!
Forming The Sides Of The Bowl
Now that you’ve determined the size of your bowl and have all the pieces cut out, it’s time to form the sides;
- Take two fat quarters at a time and lay them flat with the right sides facing each other.
- Using variegated thread, start stitching along the outer edges until you reach the end, creating an oval-shaped basket.
- Pull tight on both ends of the fabric strip while keeping even tension throughout to ensure everything stays in place.
- Repeat steps 1-3 for the remaining two fat quarters.
- Join all four pieces together by flipping one over onto another and then pinning them in place.
- Stitch the pieces together, creating the sides of your rope bowl.
- Ensure that every detail is perfectly placed to create a sturdy and beautiful finished product.
Crafting A Handle For The Basket
Now that the bowl of your rope basket is complete, it’s time to craft a handle. This will add an extra touch of elegance and style to your piece. To begin this step, you’ll need white thread, a heavy-duty sewing machine needle, and a pencil holder as well as any decorative accents you’d like to incorporate into the design.
First, measure how long you want your handle to be by wrapping it around the bowl in whatever shape or pattern looks best for your project. Once measured and cut, use a zigzag stitch with heavy-duty thread on your sewing machine to attach the handle to each side of the bowl securely.
You can also opt for hand stitching if desired but using a machine will give you more control over tightness and accuracy when securing seams.
Finally, make sure all threads are trimmed away from both sides so they don’t show once finished–this makes for a neat and tidy presentation! The addition of handles not only adds beauty but practicality too; now your basket can easily be picked up and moved wherever needed without worry about anything slipping off or coming undone.
Decorating Ideas For Baskets
Creating a rope basket is an incredibly versatile craft that can be tailored to whatever style or aesthetic you desire. The possibilities are endless, and the only limit is your imagination! Whether adding decorative accents with ribbons, beads, or even buttons–the sky’s the limit for how creative you want to get.
For those without access to a sewing machine, don’t worry; there are plenty of ways to customize your project without one. If you’d like to add colorful tassels around the handle of the bowl, simply tie pieces of yarn together in desired lengths before attaching them by hand.
Or if you’re looking for something more intricate, why not try using string art on top? Simply loop different colors of thread into patterns for a unique design that adds depth and texture.
No matter what type of decorating technique you choose, have fun with it! There’s no right or wrong way to create this piece so go ahead and express yourself through your artistic vision while still staying true to the original purpose of the item itself: creating beautiful yet functional items from everyday materials.
Quantities Of Rope Needed For A Rope Bowl
Now that you have a good idea of the types of decorations and embellishments you’d like to add, it’s time to look at how much rope you’ll need for your project. Depending on the size of the basket or bowl you’re making, there are different quantities needed in order to create something sturdy and lasting.
The amount also depends on what type of knotting technique is used; whether it be two-strand twining, three-strand plaiting, four-strand square knotting, or even five-strand round knotting–each has its own specific needs when it comes to materials.
A general rule of thumb is that if creating a smaller item such as a mug rug or coaster, then around one hundred feet should suffice. If constructing something larger like an ottoman or fruit bowl with handles, then between three hundred and five hundred feet is more appropriate. And if building a full-size storage bin? You may want to up the quantity to about seven hundred feet!
No matter what kind of container you’re crafting, make sure you factor in extra length just in case any knots come undone during construction so that repairs can easily be made without having to start from scratch. With all this information in mind, let’s move on and discuss optimal types of rope for baskets now!
Optimal Types Of Rope For Baskets
When it comes to selecting the best rope for a basket, there are a few characteristics that you should look out for.
For example, did you know that nearly 73% of woven baskets require an extra strong and sturdy rope? This is because they’re designed to carry heavy items or hold up well in extreme weather conditions. It’s important to select a cordage material with durability and strength as its primary features.
Natural fibers such as sisal, jute, cotton, or hemp make excellent choices due to their thick texture–though some may be more expensive than man-made counterparts like polyester or nylon. However, if cost isn’t an issue then natural fiber ropes can provide superior quality results when properly cared for.
In addition to choosing the right type of rope material, color selection plays an important role too! Natural fibers tend to come in earthy tones such as browns and tans while manufactured cords often have brighter hues like reds, blues, greens, and even metallic shades.
Ultimately, however, it all boils down to personal preference so feel free to experiment until you find the perfect combination for your project! With this knowledge at hand, we can now move on and explore how sewing by hand becomes another alternative option.
Sewing By Hand An Alternative Option
For those who don’t have access to a sewing machine, hand-stitching is another great option. This technique involves the use of strong thread and a needle to secure the sections of rope together. It’s important to select a durable thread that won’t break when pulled tight; cotton or waxed linen are both suitable choices for this task.
When it comes to mastering the art of hand stitching, practice really does make perfect! Start by inserting one end of your cord into the eye of the needle–try using tweezers if you’re having difficulty getting it through–and then begin weaving in and out around each rope section as desired.
As you go along remember to pull gently yet firmly on the thread so that all parts remain tightly secured against one another. Additionally, try not to knot too close to an intersection point because this could weaken its structural integrity over time.
There may be some trial and error involved with this process but once you get comfortable with its fundamentals it becomes relatively easy and enjoyable! With these basics out of the way let’s move onto discussing some tips and tricks for successful results…
Tips And Tricks For Successful Results
When it comes to making a rope basket without the use of a sewing machine, there are some key tips and tricks for achieving successful results.
- Make sure you select high-quality materials that won’t fray or unravel over time; natural fibers such as jute or cotton cordage tend to be more durable than synthetic options like plastic twine.
- Pay attention to the type of knot being used–a lark’s head is commonly recommended as this is both easy to tie and secure.
- Take your time with stitching in order to ensure that all sections remain tightly knitted together. It can be helpful here to use smaller stitches when possible because these will create stronger bonds between two points.
- Don’t forget about aesthetics! Pay attention to how each stitch looks on the finished product so that it has an overall beautiful appearance.
TIP: When hand-stitching a rope basket, try adding decorative elements such as beads or buttons. This not only adds visual interest but also reinforces the structural integrity of your workpiece by providing extra support in vulnerable areas.
Conclusion
Making a rope basket without a sewing machine may seem daunting, but with the right supplies and some patience, it can be done. Assembling each component of your basket is like putting together pieces of a puzzle; once you have all the pieces in place the reward will be seen! The end result of this project is both aesthetically pleasing and rewarding.
The texture of the rope against the smoothness of the bowl creates an interesting juxtaposition that gives off a vintage charm. Not to mention, having a handmade piece to show off around your house or give as a gift makes it that much more special.
Assembling these components can take time but it’s worth it when you step back to admire your creation – so don’t rush this process! With patience and creativity, you’ll have yourself one beautiful rope basket before you know it.
FAQs
How do you make a rope basket without a sewing machine?
1. Gather your supplies. You will need a length of rope, scissors, and a hot glue gun.
2. Start by cutting a length of rope that is long enough to wrap around the circumference of the basket you are creating. Make sure the rope is at least twice as long as the circumference of the basket.
3. Begin wrapping the rope around the circumference of the basket, making sure to overlap the ends by at least 1 inch.
4. Secure the rope in place with hot glue. Make sure to use plenty of glue and to let it dry before moving on to the next step.
5. Start making the basket’s walls by wrapping the rope in a circular pattern. Make sure to glue the rope in place after each wrap.
6. As you continue wrapping the rope, you can adjust the shape of the basket by pulling or pushing the rope.
7. When you reach the desired height of the basket, secure the rope with hot glue and let it dry.
8. Cut the remaining rope and glue it in place.
9. Trim off any excess rope and your basket is complete!
How do you hand stitch a rope basket?
1. Start by cutting two pieces of rope. The length of the rope should be determined by the size of the basket you would like to make.
2. Take one piece of rope and fold it in half, then tie a knot at the end. This will be the base of your basket.
3. Take the remaining piece of rope and wrap it around the first piece, beginning at the knot. Be sure to wrap tightly and evenly.
4. Take a needle and thread and begin to stitch the two pieces of rope together, using a whip stitch. Stitch around the entire circumference of the basket.
5. Once you have stitched the entire circumference, tie off the thread and cut off the excess.
6. You now have a completed rope basket!
What are 4 materials used to make baskets?
1. Wicker
2. Willow
3. Reed
4. Seagrass
What kind of rope is used for baskets?
Natural rope, such as jute or sisal, is typically used for basket weaving.
